You can migrate from Harvest to Keito from inside Keito’s account setup. Connect Harvest with a Personal Access Token, choose the records to import, let the automated migration run in dependency order, and then reconcile the resulting clients, projects, time, expenses and financial documents.
This guide shows the complete process with screenshots from a production-like test migration. We imported 3 clients, 3 projects, 15 time entries, 3 expenses, 3 invoices and 1 estimate. Every background job completed with zero skipped records and no errors.
Important: The screenshots use fictional agency data in a disposable Harvest account. You do not need to delete or change your live Harvest data before importing it. Keep Harvest available as your read-only source until you have reconciled the migration.
For a shorter operational path, use the Migration documentation and its reusable verification and cutover checklists. If reporting is part of your evaluation, the illustrated Keito reporting guide shows the Pro and Business screens side by side.
What the Harvest importer moves
Keito reads the records you select from Harvest and imports them in an order that preserves their relationships.
| Harvest data | Result in Keito |
|---|---|
| Clients | Clients with names, addresses and project relationships |
| Projects | Projects with client, code, budget and assignments |
| Tasks | Workspace tasks, reusing matching Keito defaults |
| Team members | Members added to the workspace without automatically sending invitations |
| Time entries | Dated entries with project, task, duration, notes and billable state |
| Expenses | Dated expenses with project, category, notes and amount |
| Expense categories | Categories, reusing matching Keito defaults |
| Invoices | Document number, client, dates, state, line items and balances |
| Estimates | Document number, client, dates, state and line items |
| Report templates | Nine Keito starter reports generated for the new workspace |
The importer also offers roles when roles are present in the Harvest account. If Harvest has no roles, that option is disabled.
Before you migrate from Harvest
Set aside a short validation window and make sure you can answer these questions:
- Are you a Harvest administrator with access to the records your team needs?
- Do you know which Harvest user should map to your new Keito login?
- Will the team stop entering new Harvest time during the final cutover?
- Who will compare record counts, total hours and invoice balances after import?
- How long will you keep Harvest available as a rollback reference?
It is also sensible to download Harvest’s standard exports before starting. They give you a separate reconciliation file even though Keito uses the API for the migration.
Harvest documents Personal Access Tokens as the quickest authentication method for scripts and account-to-account synchronisation. Create one in the Developers section of Harvest ID, and treat it like a password. See Harvest’s authentication documentation for the current instructions.
Step 1: Create your Keito workspace
Start a Keito free trial and enter the company details that should appear on projects, invoices and estimates.
The form starts with the company identity and regional settings:
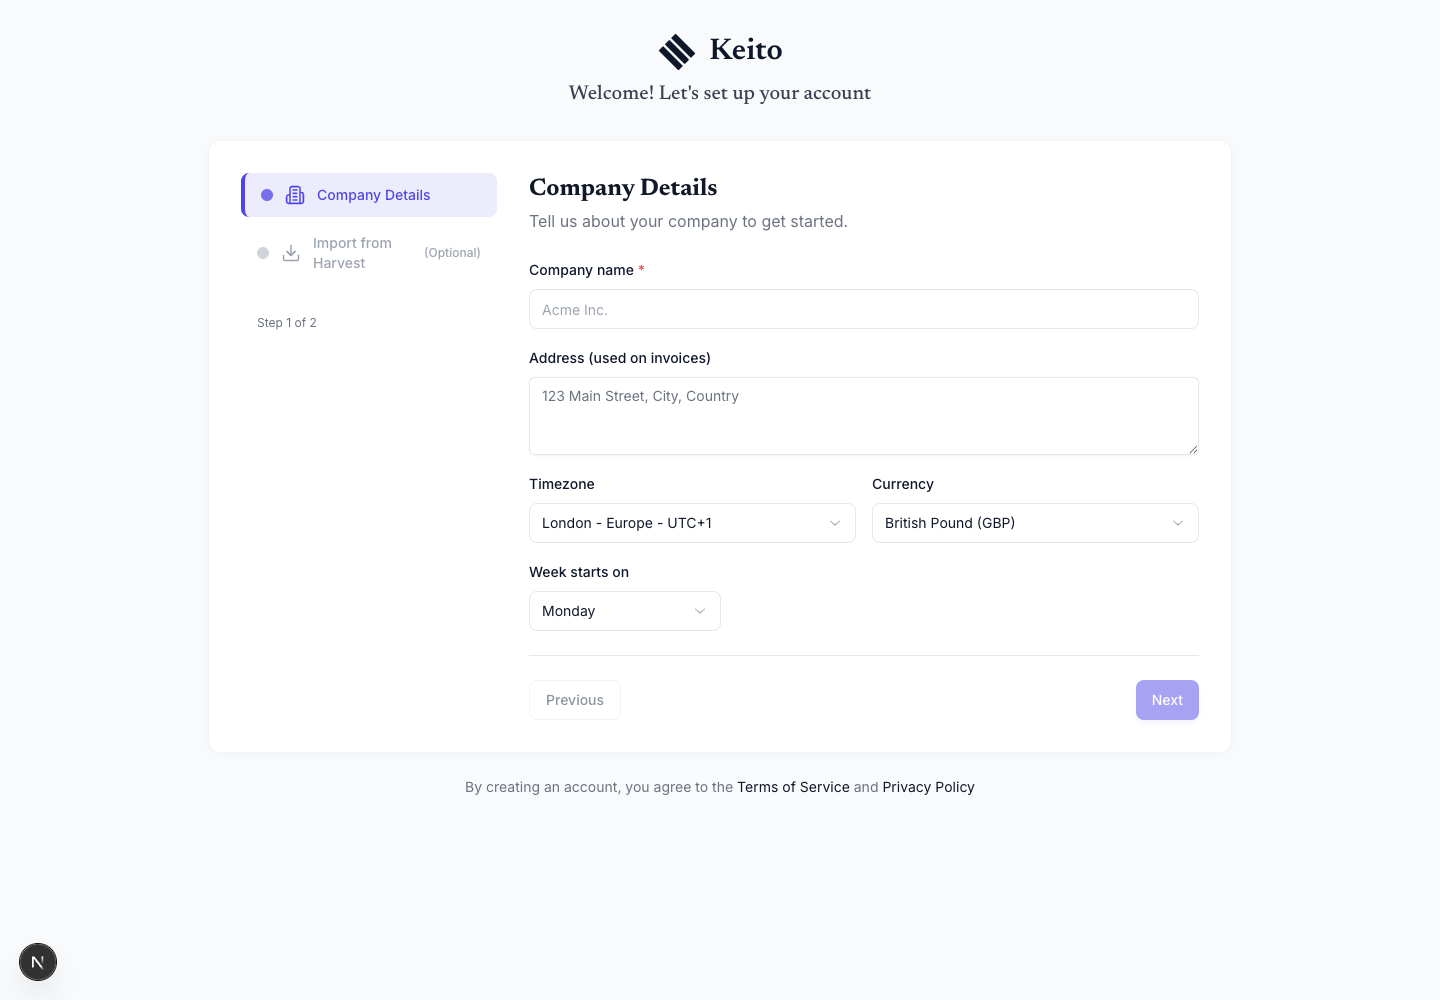
Review the company name, address, currency and timezone before continuing. These are the target workspace settings; they are not copied from Harvest.
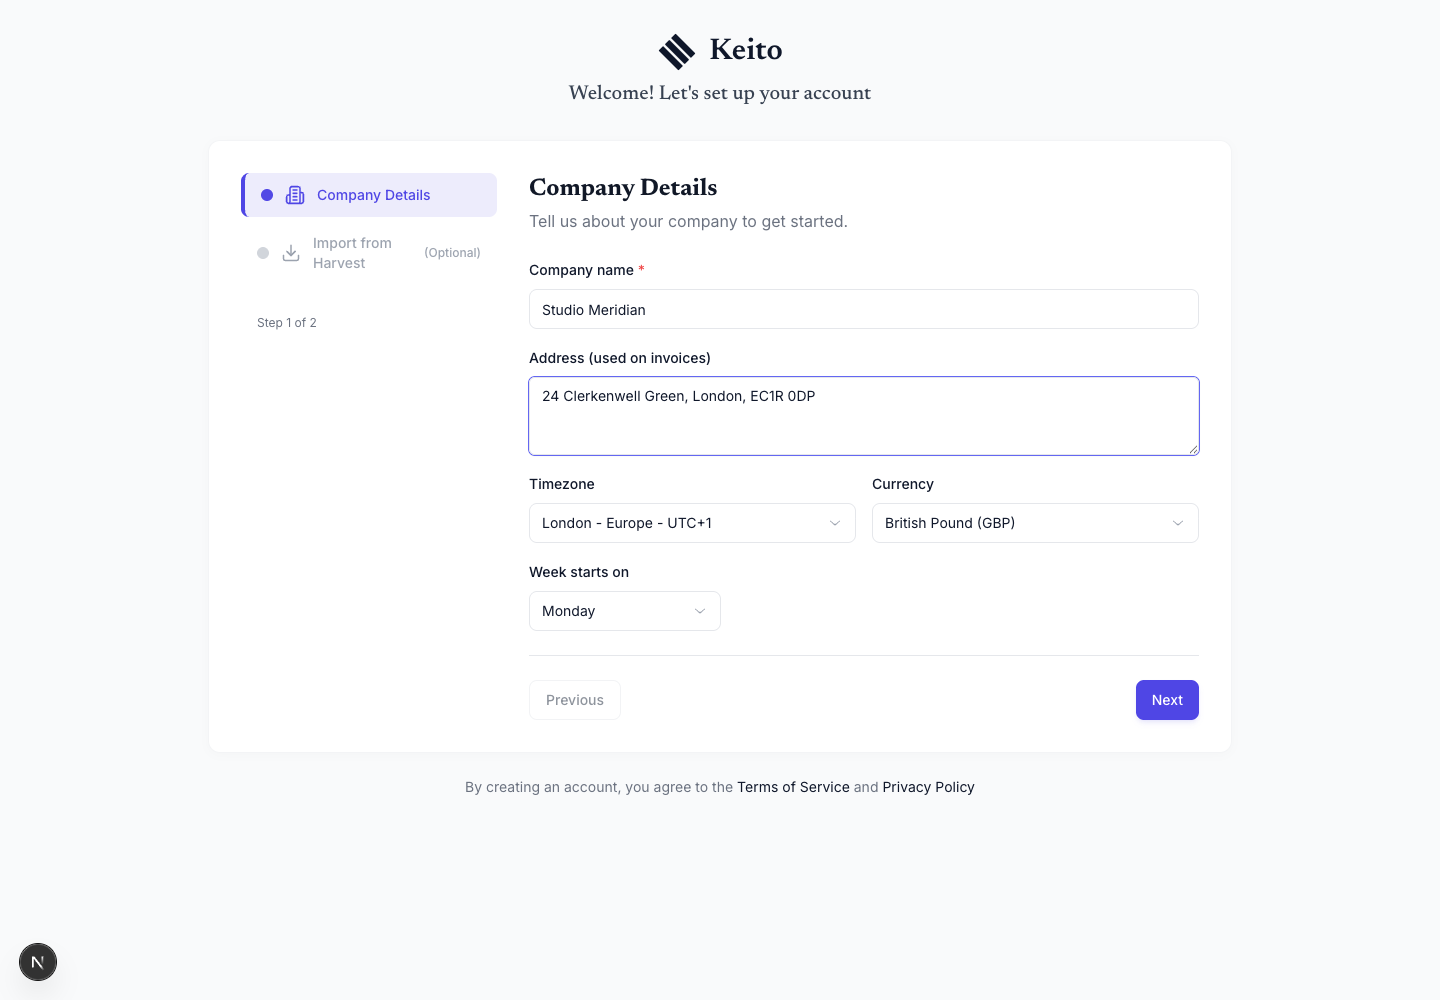
Our example workspace is Studio Meridian, a fictional UK web-design company using GBP.
Step 2: Connect Harvest securely
The second onboarding step is Import from Harvest. You need:
- your Harvest Account ID;
- a Harvest Personal Access Token;
- permission to read the source records you want to migrate.
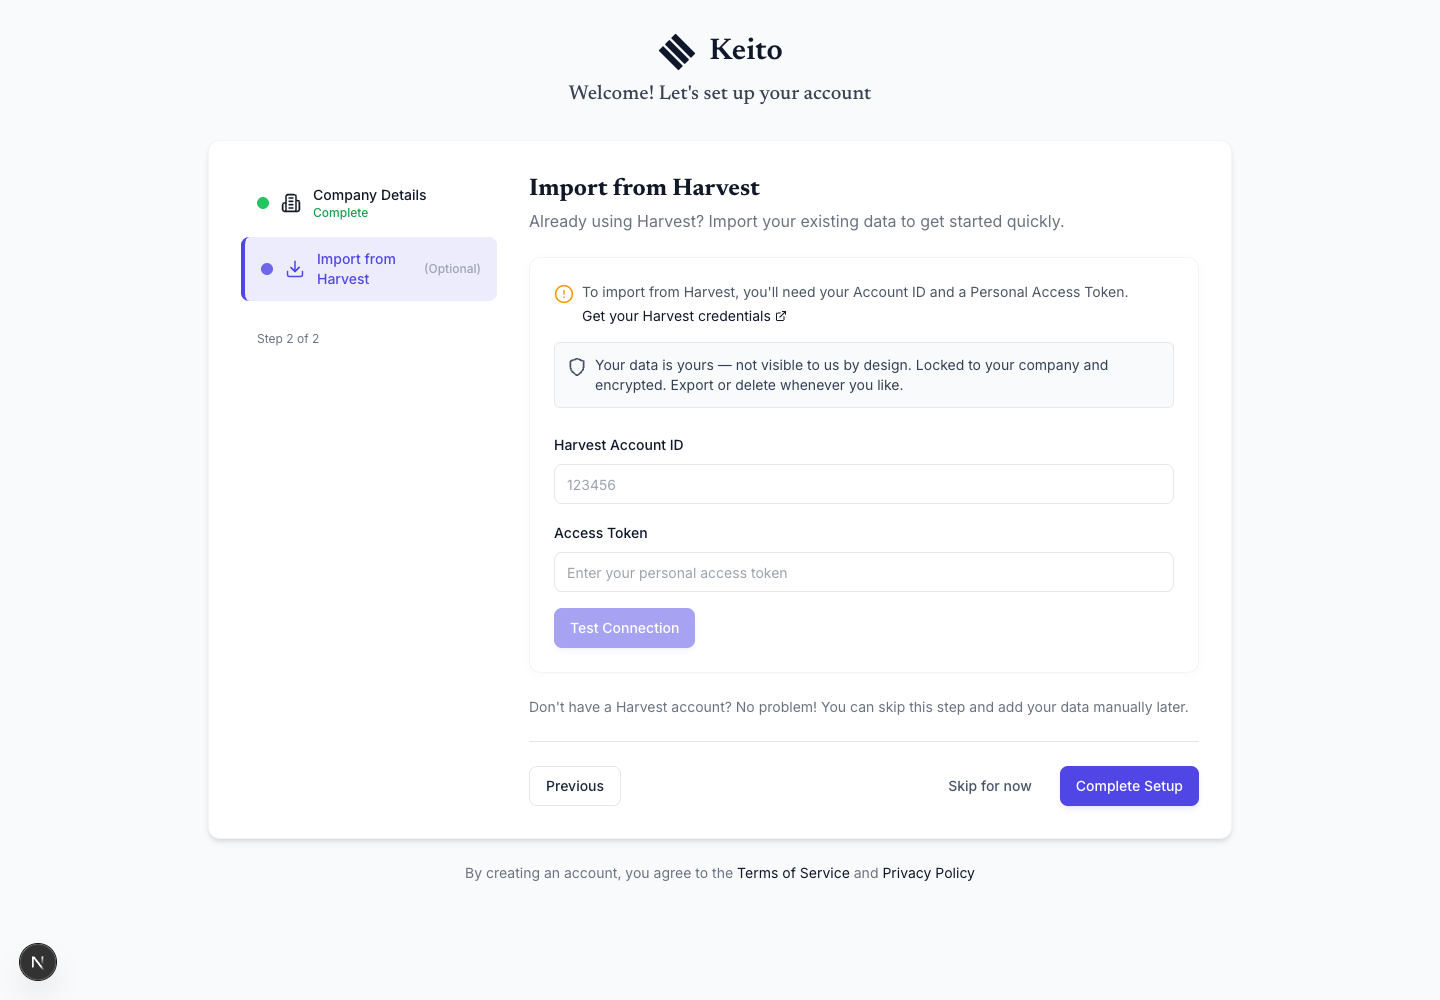
Enter both values, then select Test Connection. Keito masks the Account ID and token as password fields so they are not displayed on screen.
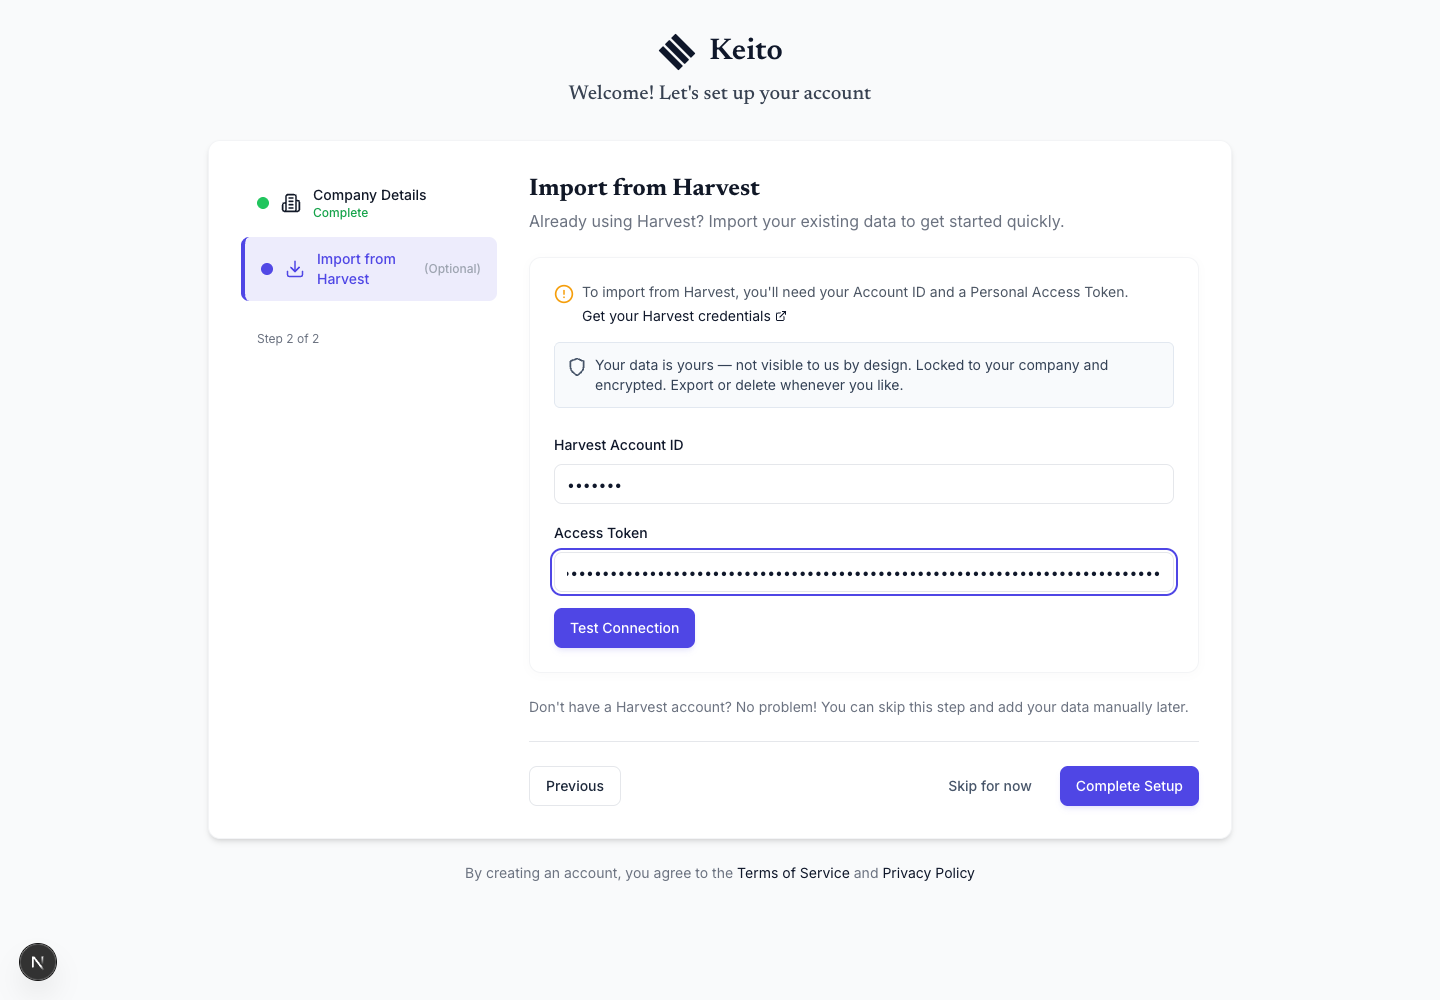
Do not paste the token into project documentation, chat messages or screenshots. If you created a temporary token for the migration, revoke or rotate it after the final reconciliation.
Step 3: Test the connection and review the source
After Keito connects, it shows how many records are available for each supported data type. This preview is your first reconciliation checkpoint.
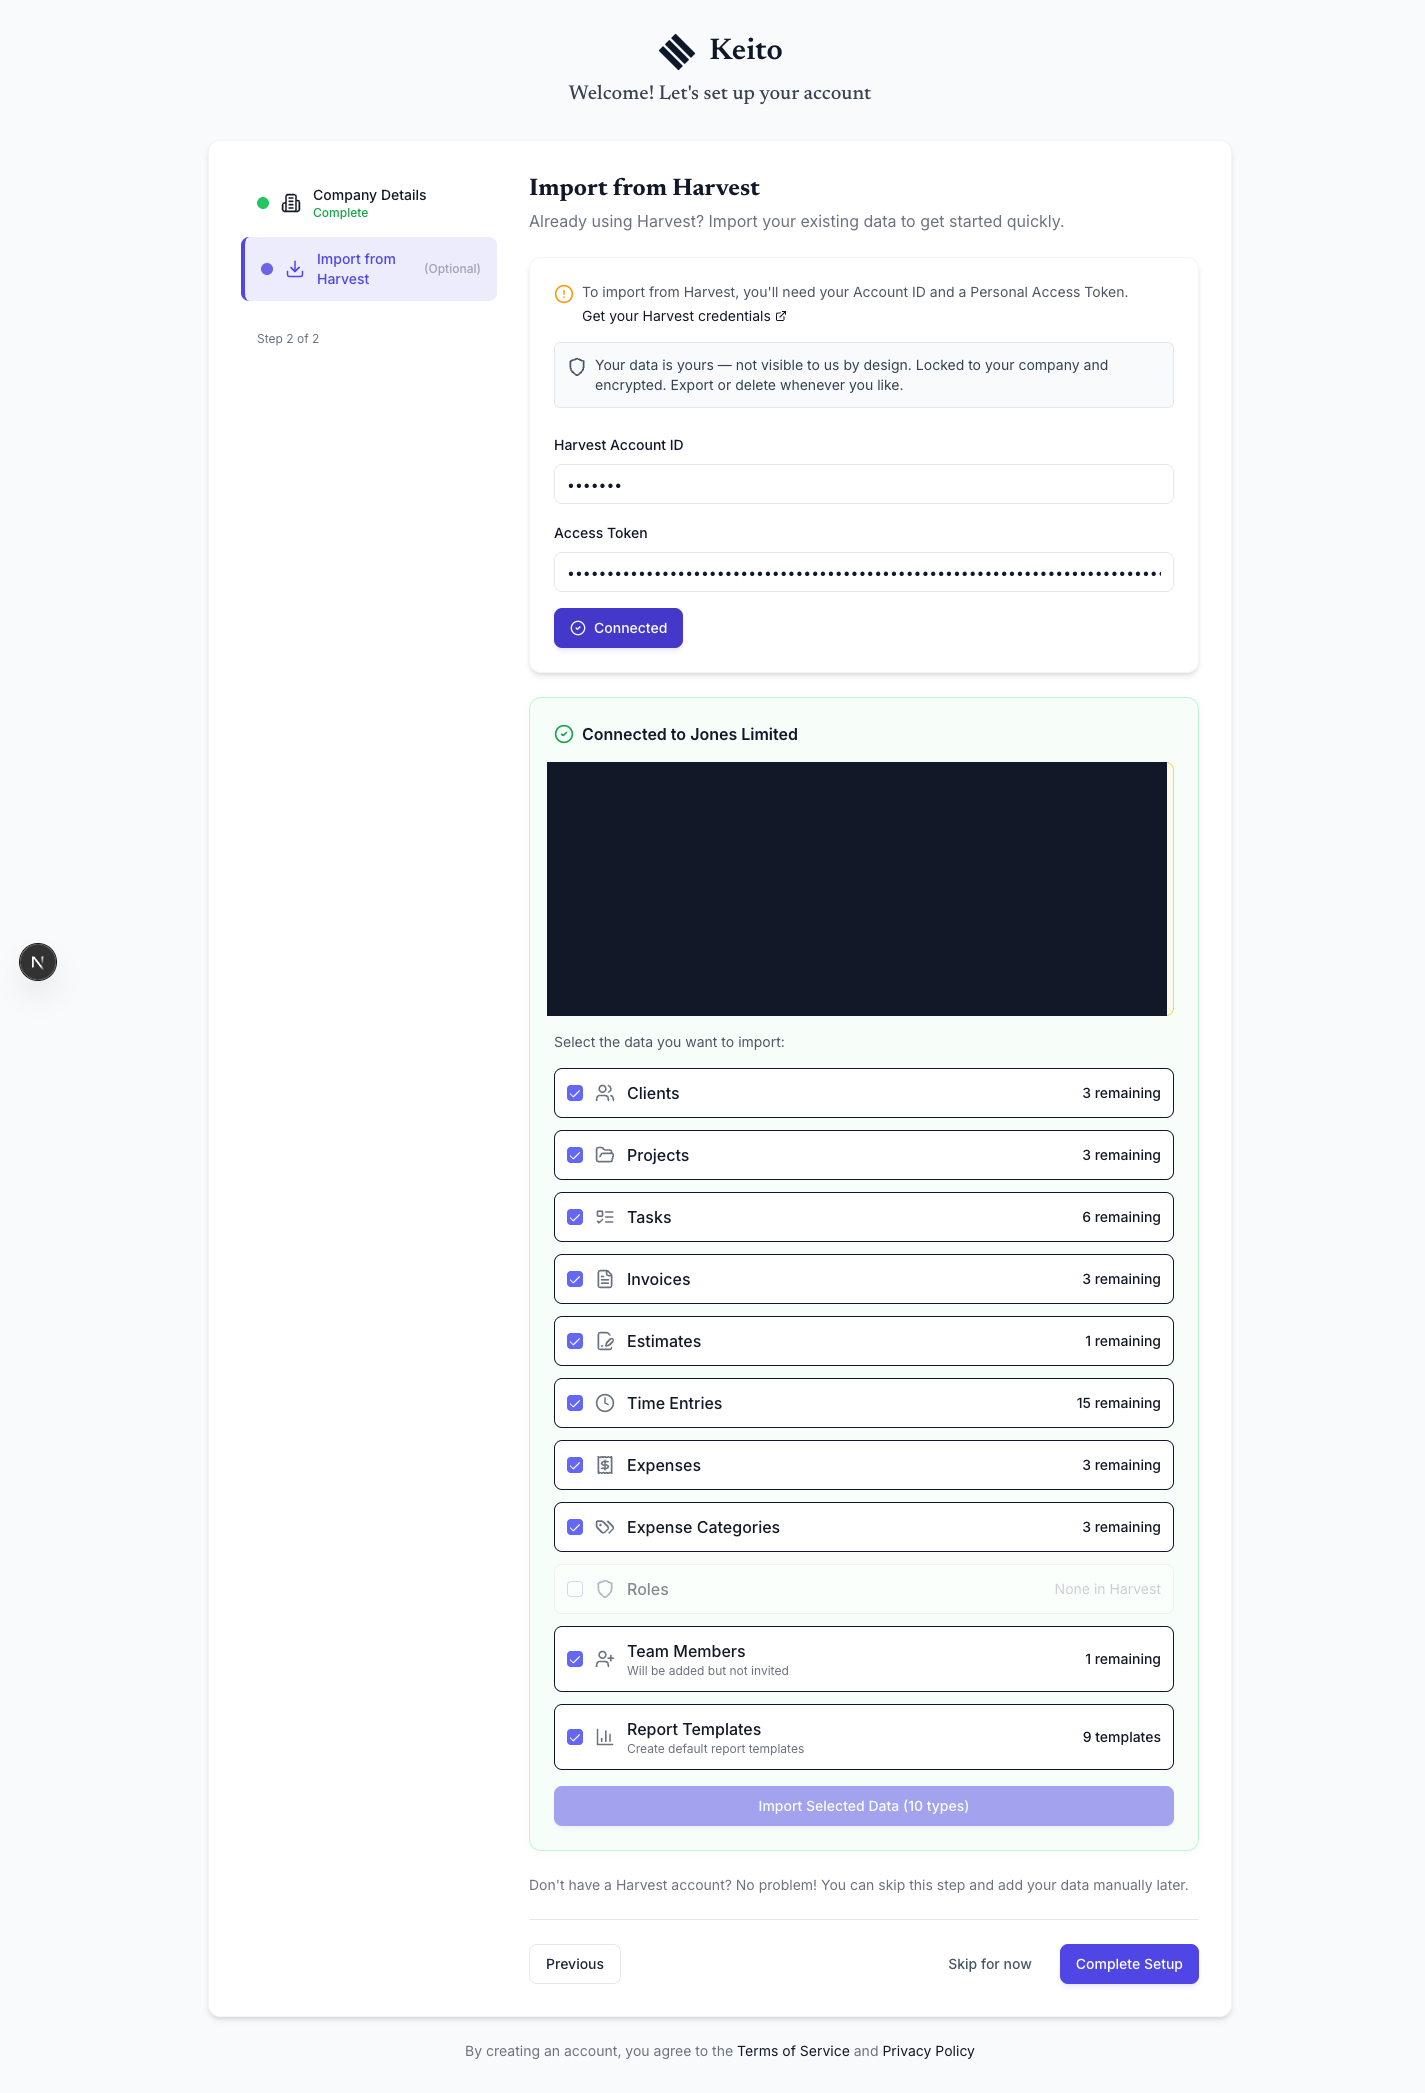
The identity-matching panel is redacted in this screenshot because it contains the Harvest owner’s name and email. In your migration, select the Harvest user who represents your current Keito login. This preserves ownership of that person’s imported time and documents.
Review every count before starting:
- Are all expected clients and active projects represented?
- Does the time-entry count cover the history you need?
- Are invoices, estimates and expenses available?
- Are archived or inactive records intentionally included?
- Does the team-member count make sense?
Then select the data types to migrate. In our production-like test, all ten available types were selected.
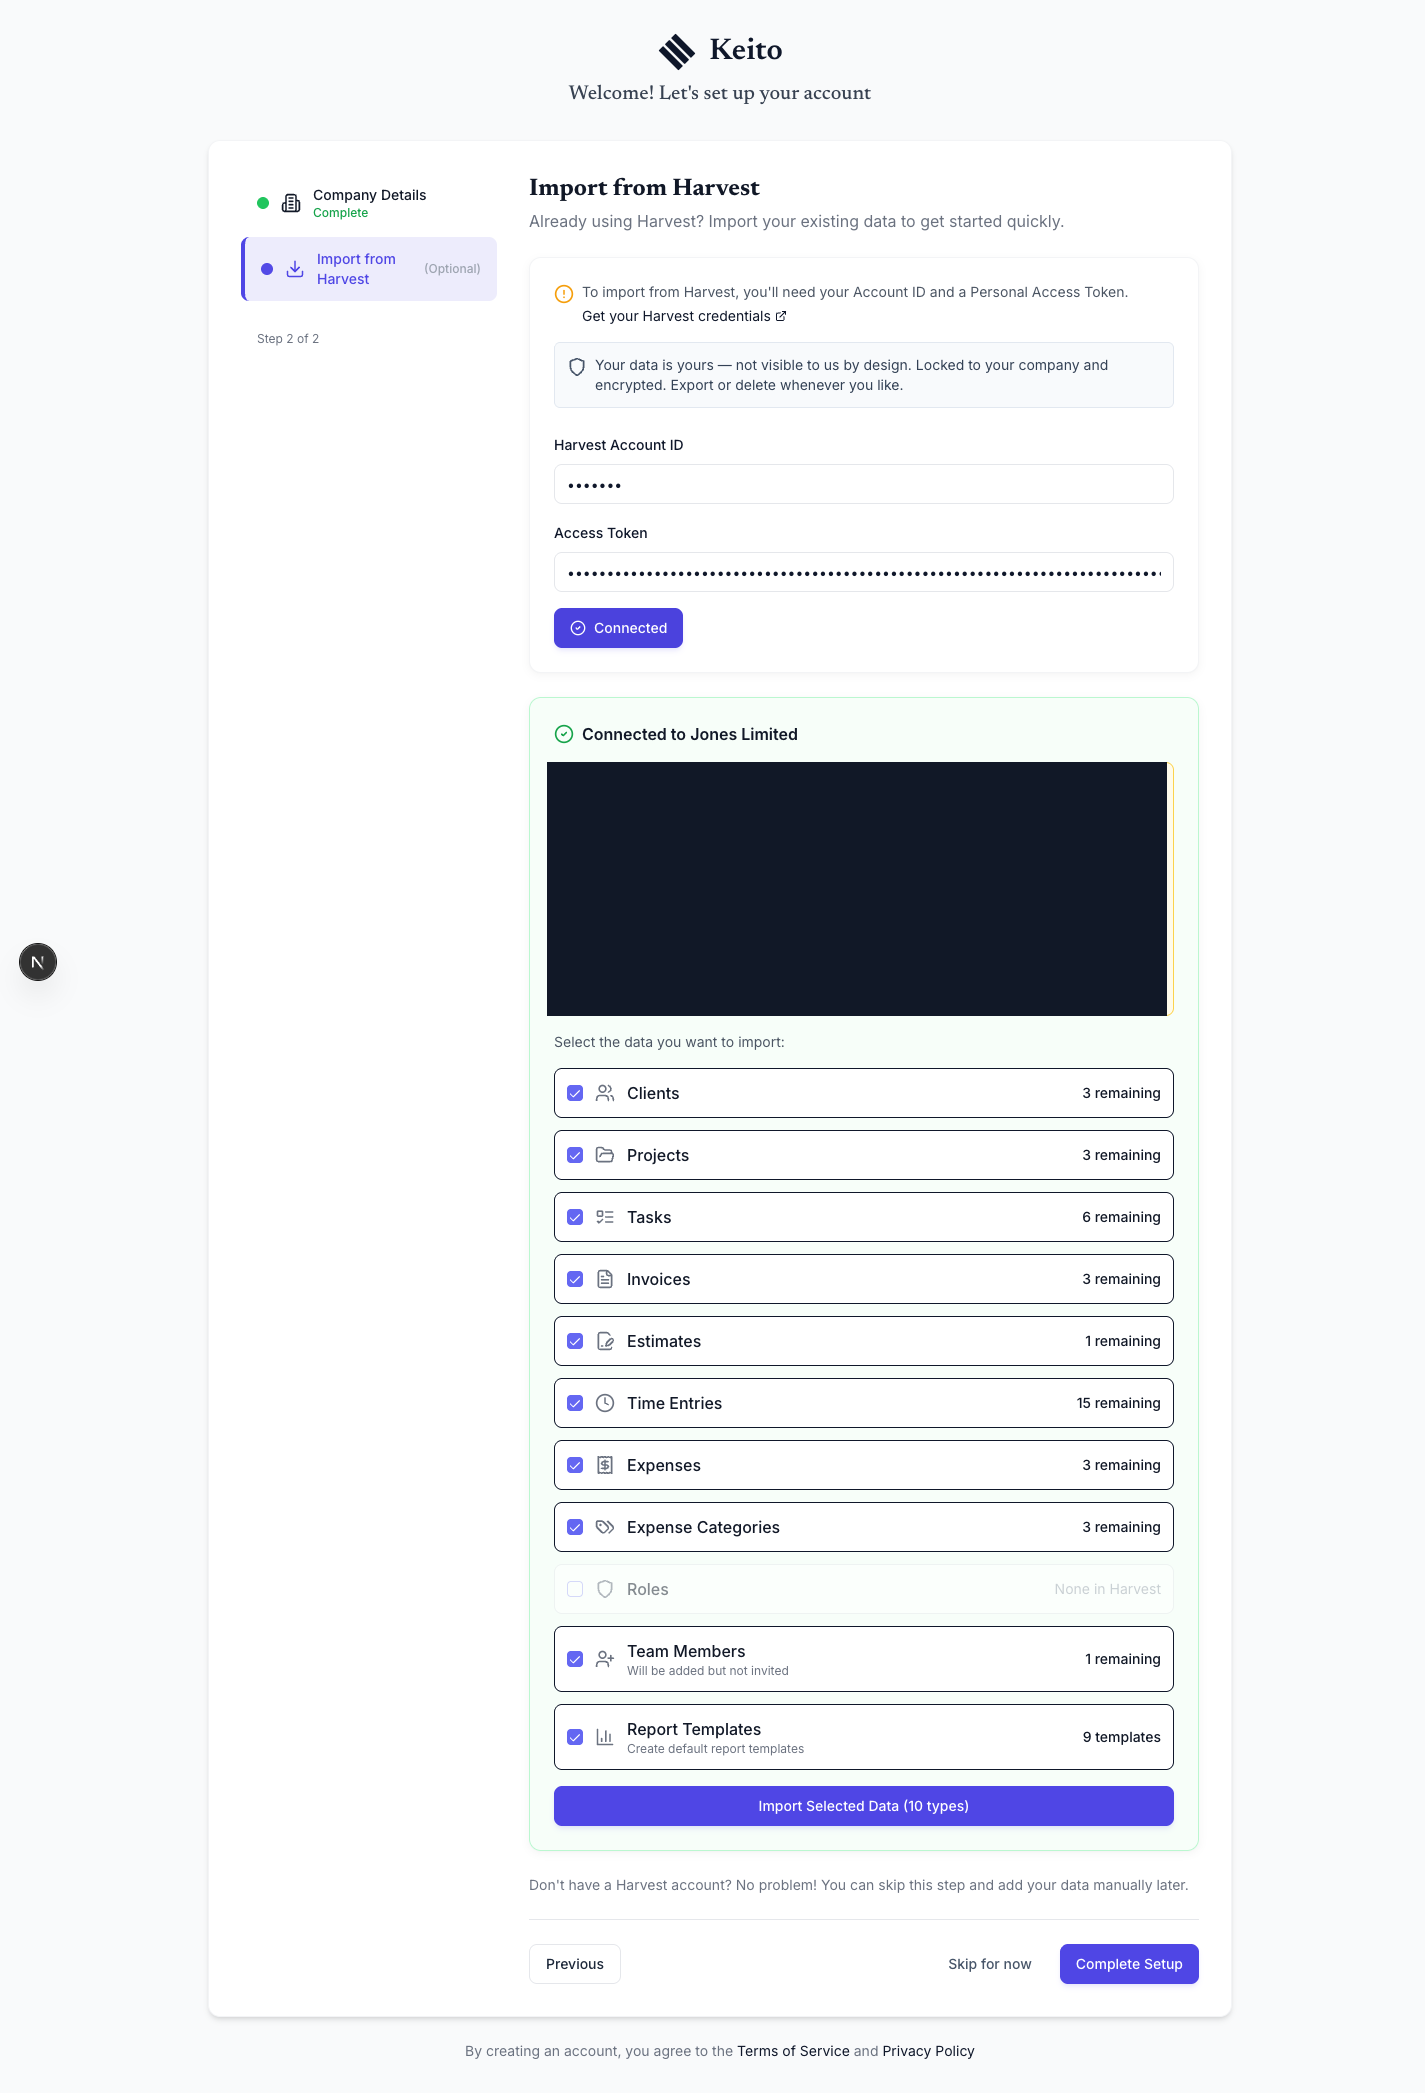
If the preview does not match Harvest, stop here. Confirm that the token belongs to the correct account and that its user has sufficient permissions. Harvest states that API permissions mirror the user’s account permissions.
Step 4: Run the automated Harvest migration
Keito imports records in phases because later records depend on earlier ones. A time entry cannot be created until its client, project, task and user mappings exist; an invoice may depend on a client and project.
The sequence is:
- Roles and users
- Clients, tasks and expense categories
- Projects and assignments
- Time entries
- Expenses, invoices, estimates and reports
Completed phases persist, so closing the page does not discard work that has already finished.
Phase 1: roles and users
The first phase establishes the people and role mappings used by assignments, time entries and financial documents.
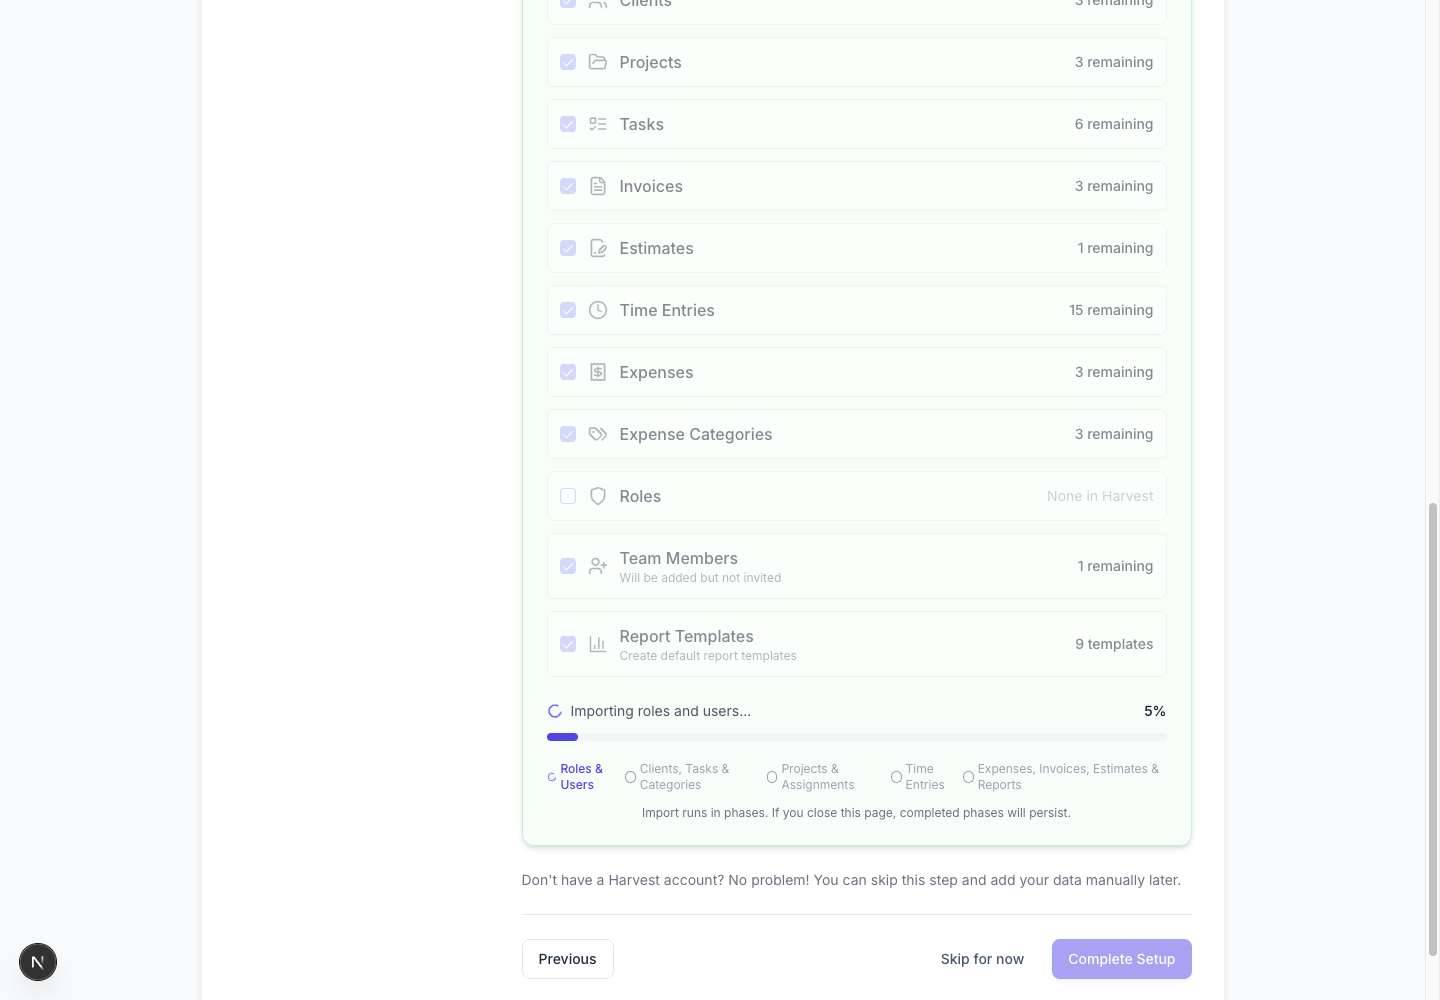
Imported team members are added but not automatically invited. This gives an administrator time to review names, roles and permissions before sending invitations.
Phase 2: clients, tasks and expense categories
Reference data comes next. Keito reuses a matching built-in task or expense category rather than creating a duplicate with the same purpose.
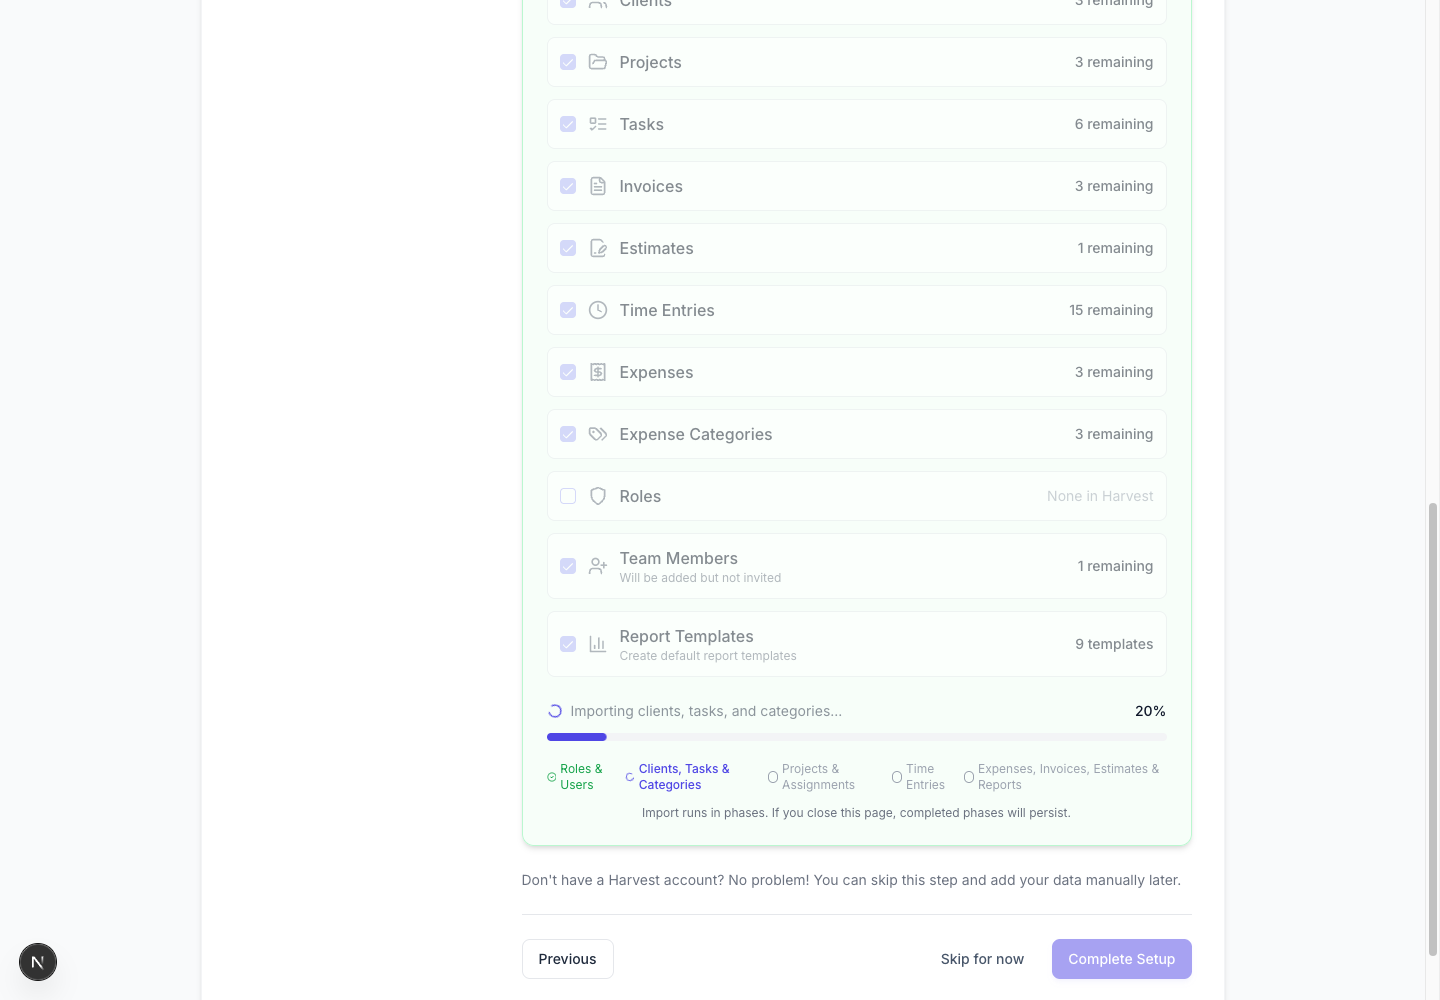
This deduplication explains why the final Keito task and category totals can be higher than the number created by the importer: Keito’s defaults remain available alongside source-specific records.
Phase 3: projects and assignments
Once clients, tasks and people exist, Keito can create projects with their client, budget, task and user relationships.
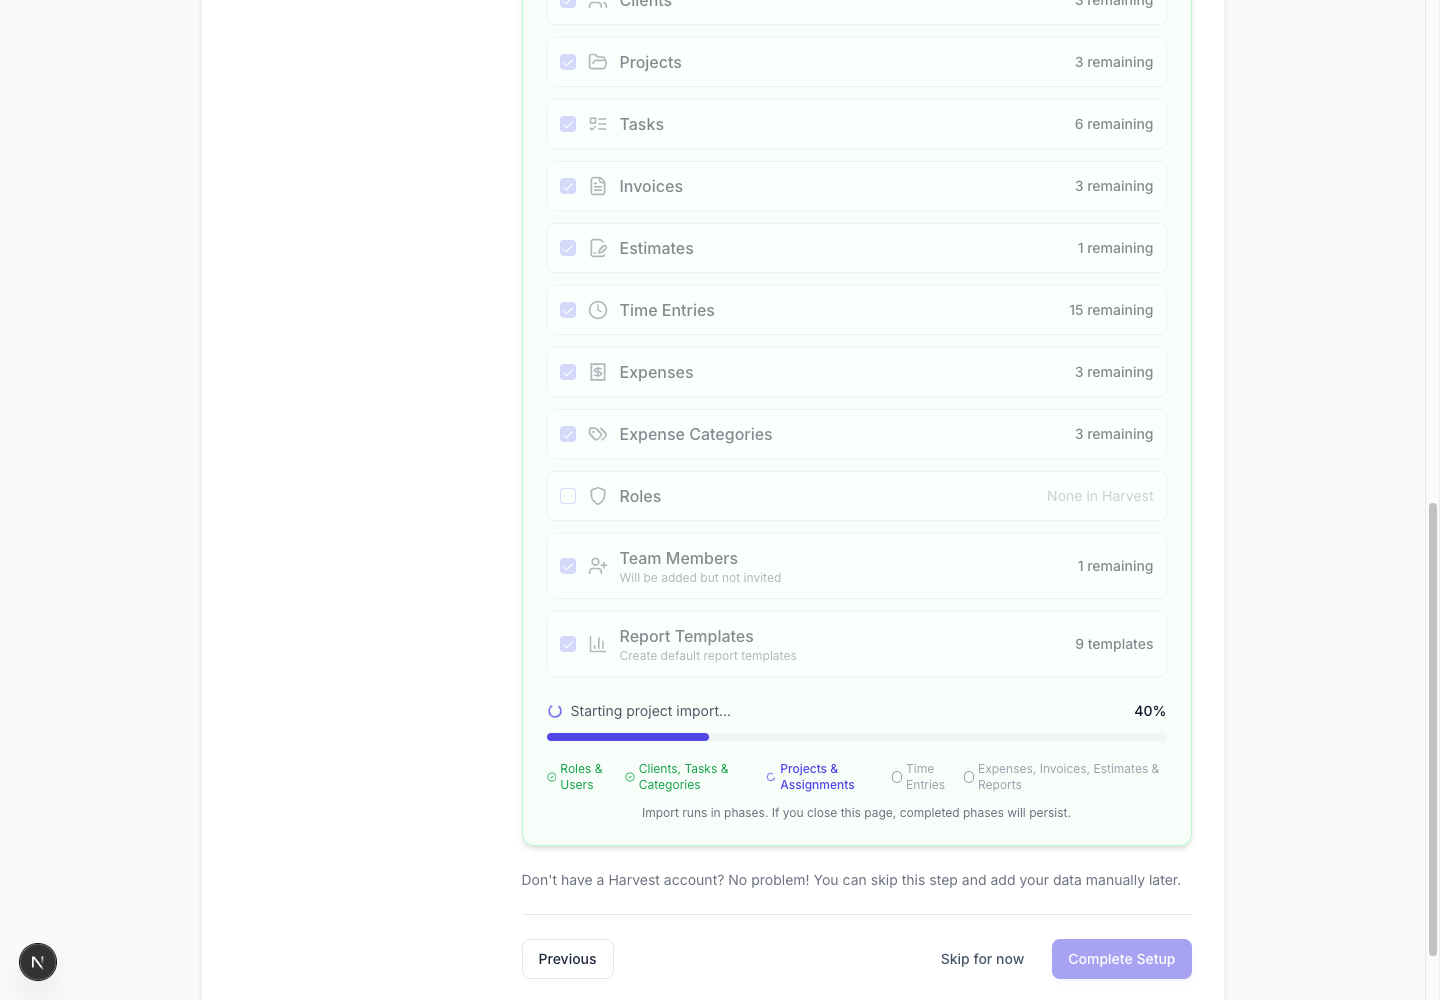
Phase 4: time entries
Keito now imports historical time against the mapped person, client, project and task.
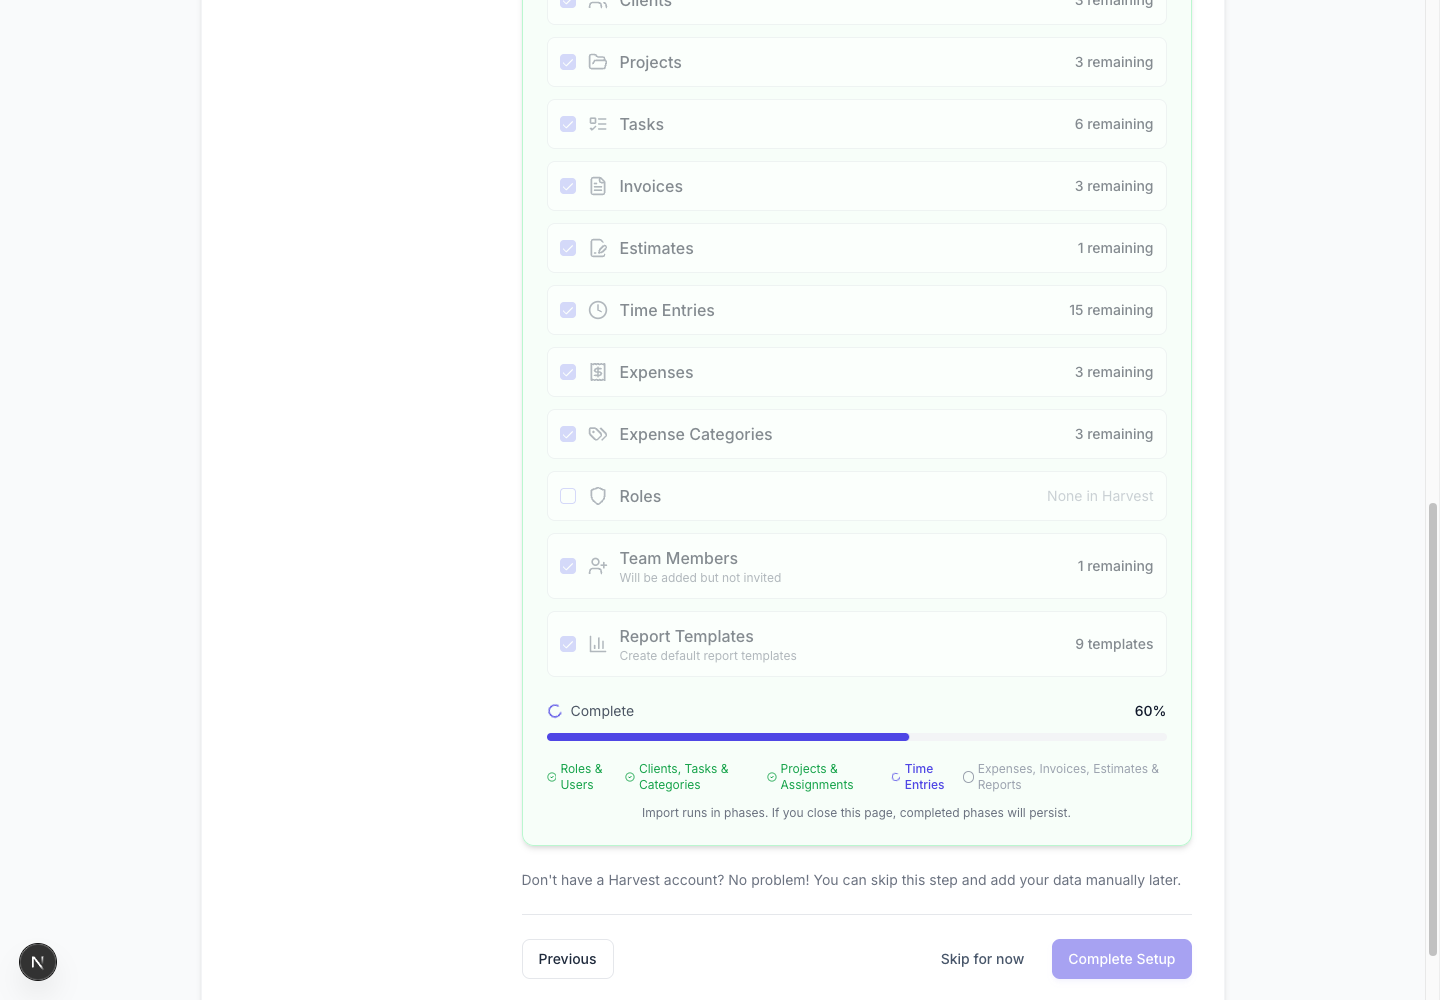
The small test dataset finished within one polling interval. That is why the per-job label in this capture already reads Complete while the overall progress indicator has just advanced to the time-entry phase.
Phase 5: expenses, invoices, estimates and reports
Financial records come last, after all of their dependencies are available.
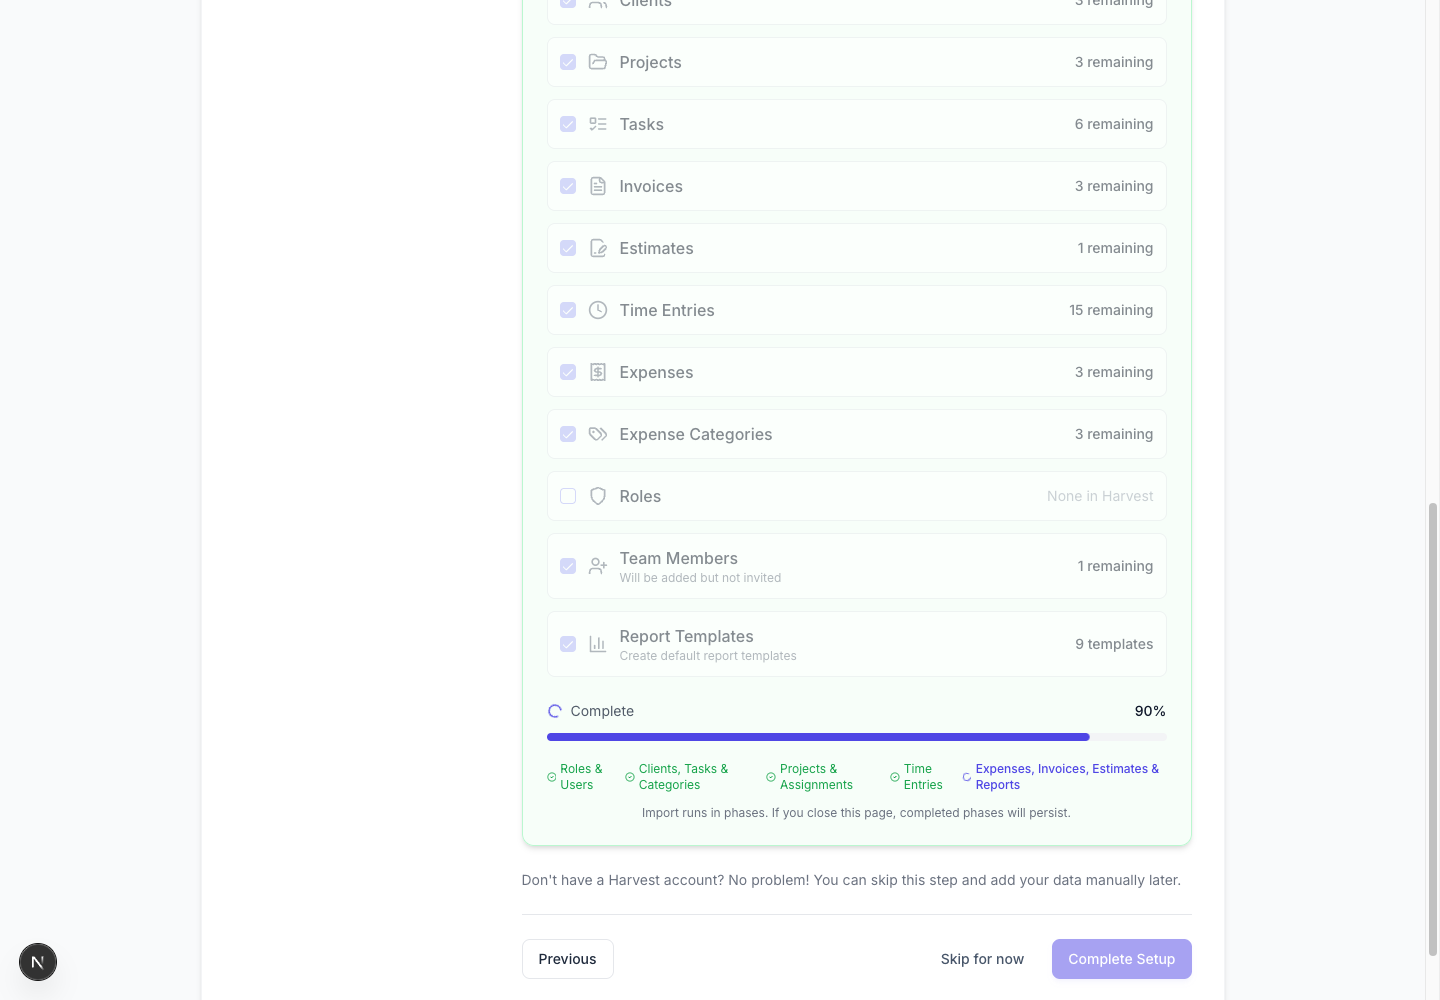
Again, the job completed faster than the next interface refresh, so the phase marker and overall 90% progress provide the clearest indication of the active stage.
When every selected phase has completed, Keito shows a final success state.
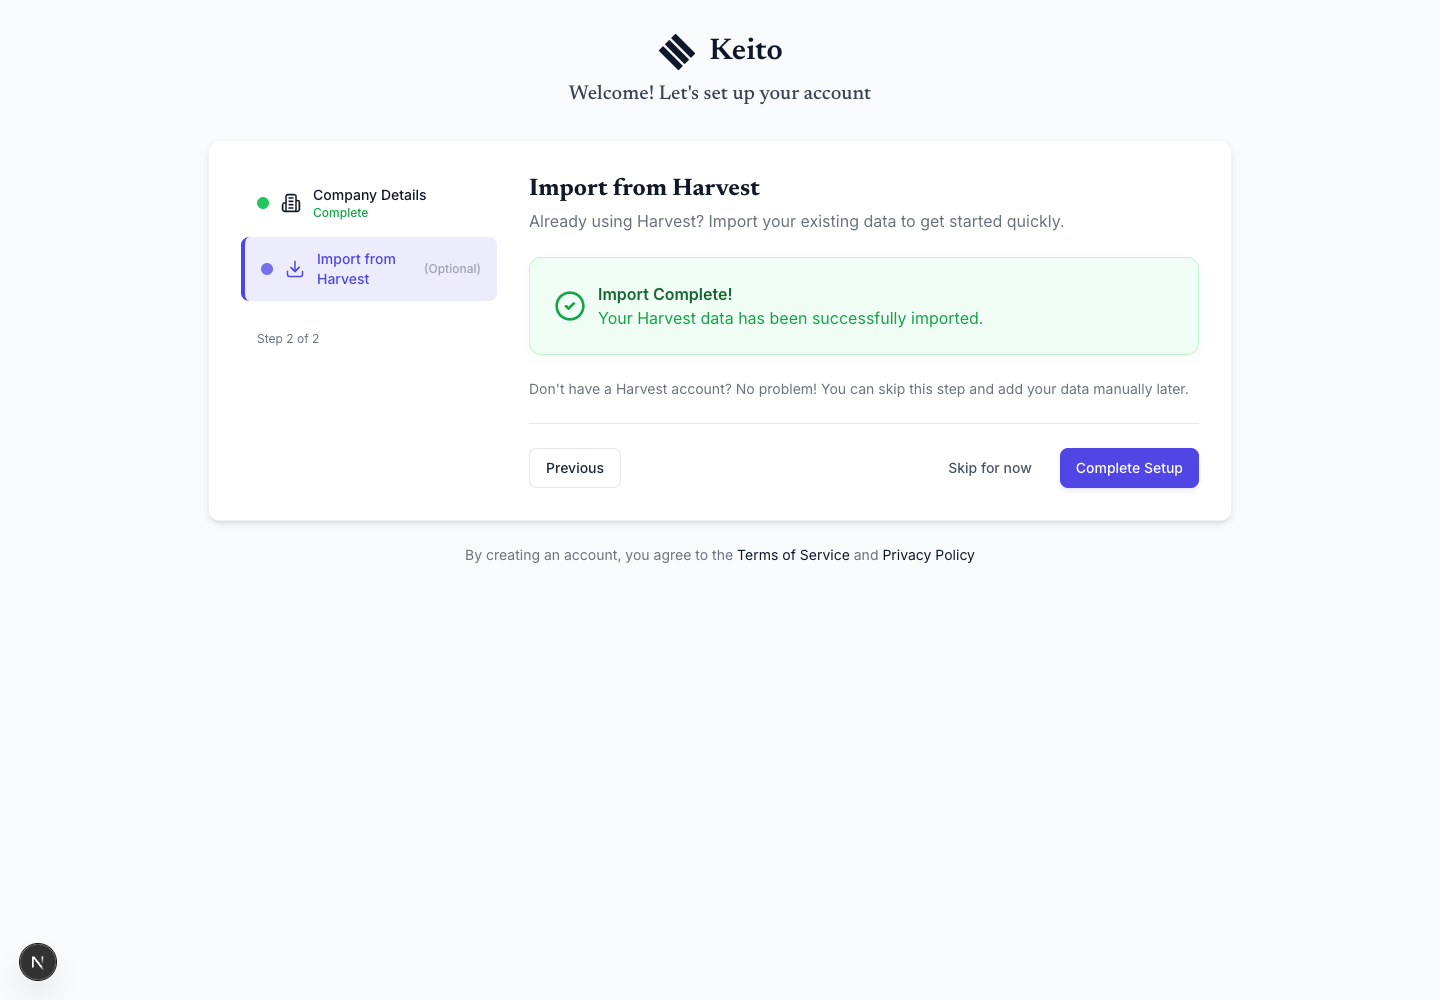
Select Complete Setup to enter the workspace.
Step 5: Verify every imported area
Do not treat a green completion message as the end of a business-data migration. Reconcile the result in the screens your team will actually use.
Verify time entries
Open Time and choose a week that contains imported work. Confirm the project, client, task, duration, notes and submission state.
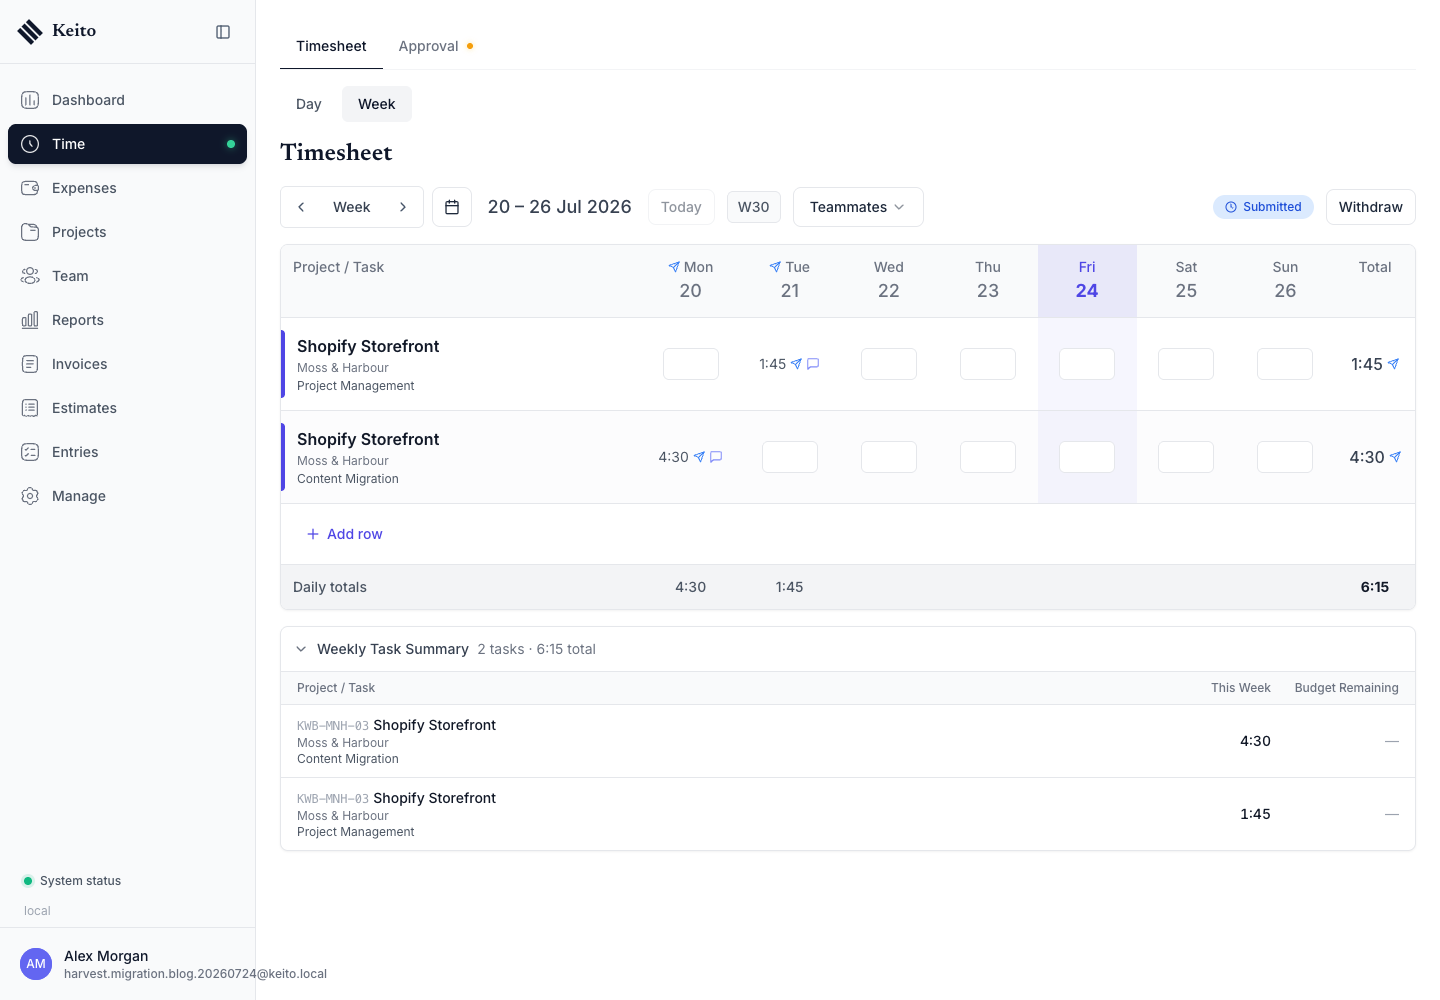
In this example, the Shopify Storefront project has 4 hours 30 minutes of Content Migration and 1 hour 45 minutes of Project Management, for a 6 hour 15 minute weekly total.
Verify clients
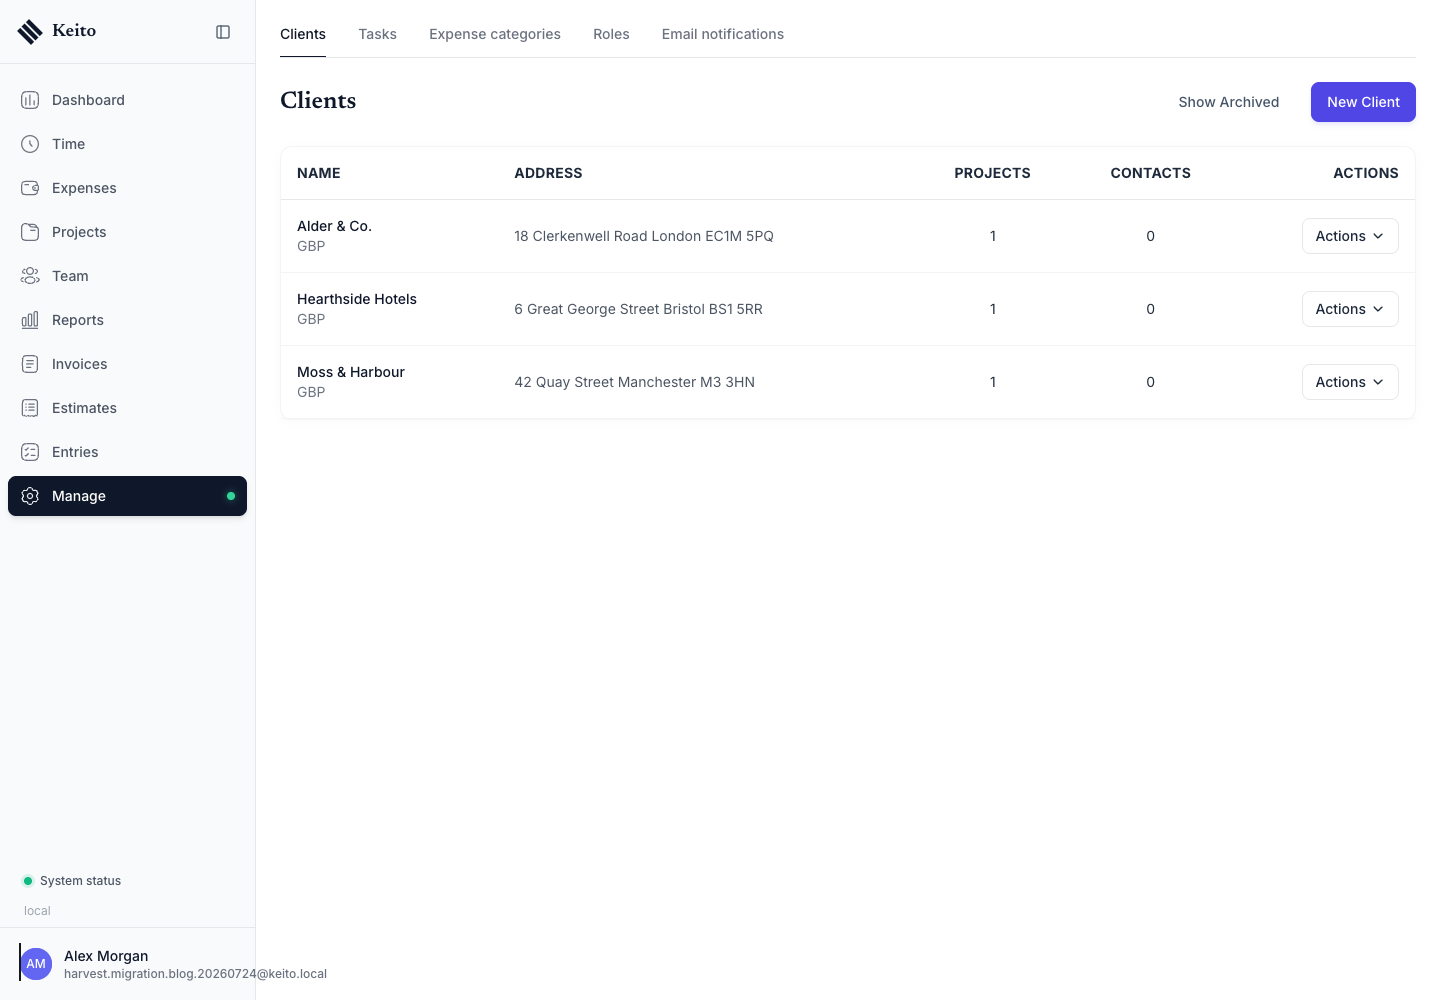
Go to Manage → Clients. Compare the client count, names, addresses and project totals with the Harvest preview.
Verify projects and budgets
Open Projects and check each project’s client, code, budget type, hours and remaining budget.
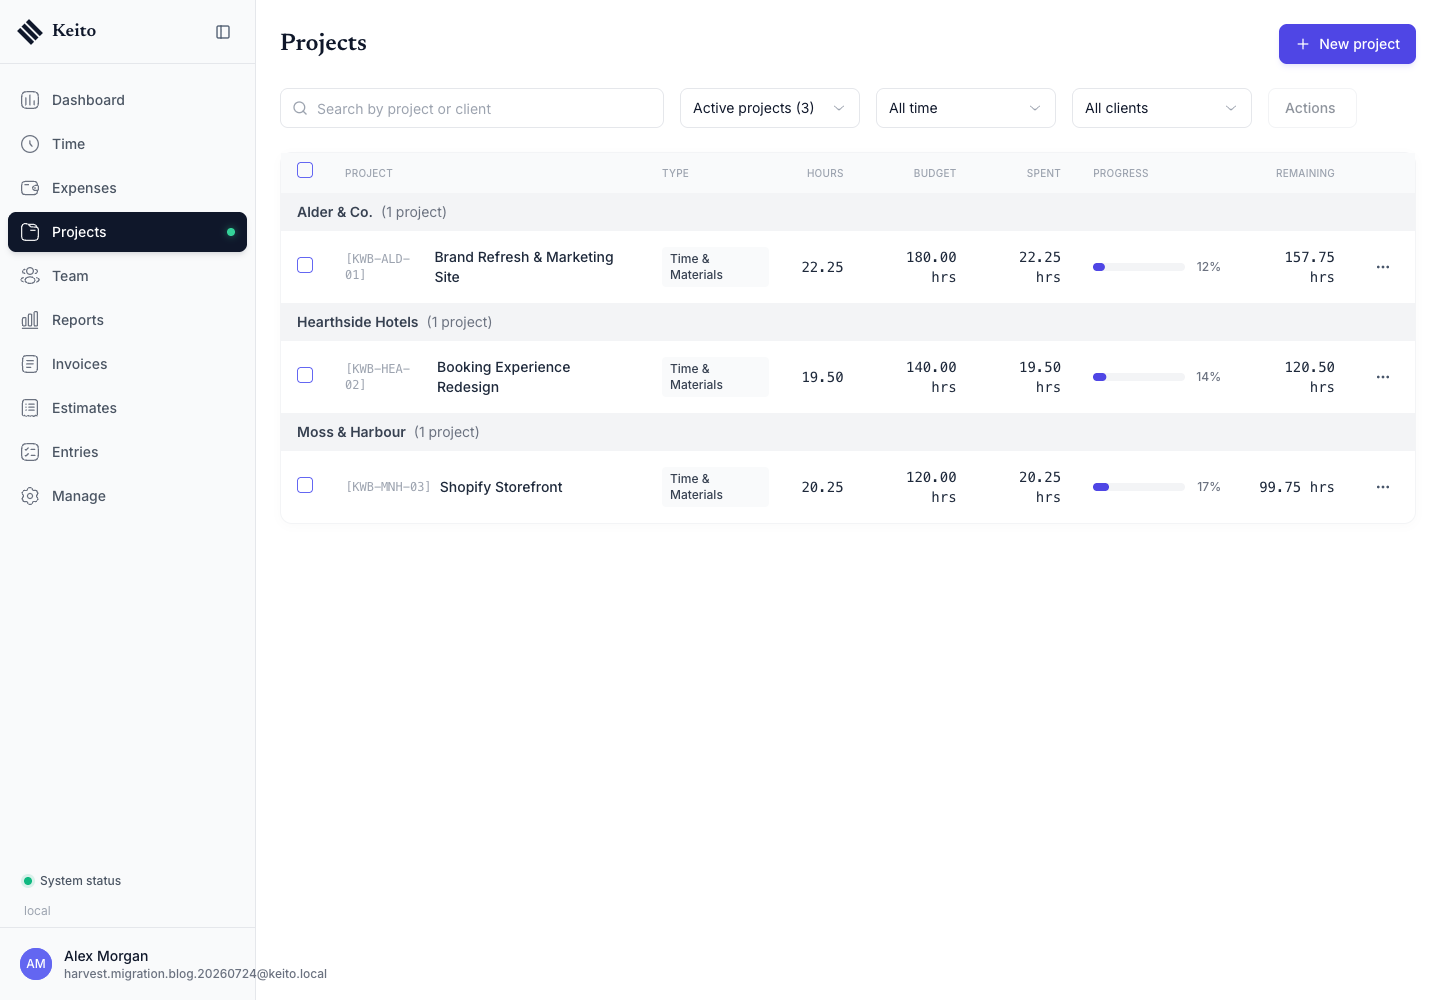
Project codes are especially useful for spot checks because they provide a stable identifier when client and project names are similar.
Verify expenses
Open Expenses and compare dates, categories, project relationships, billable states, notes and amounts.
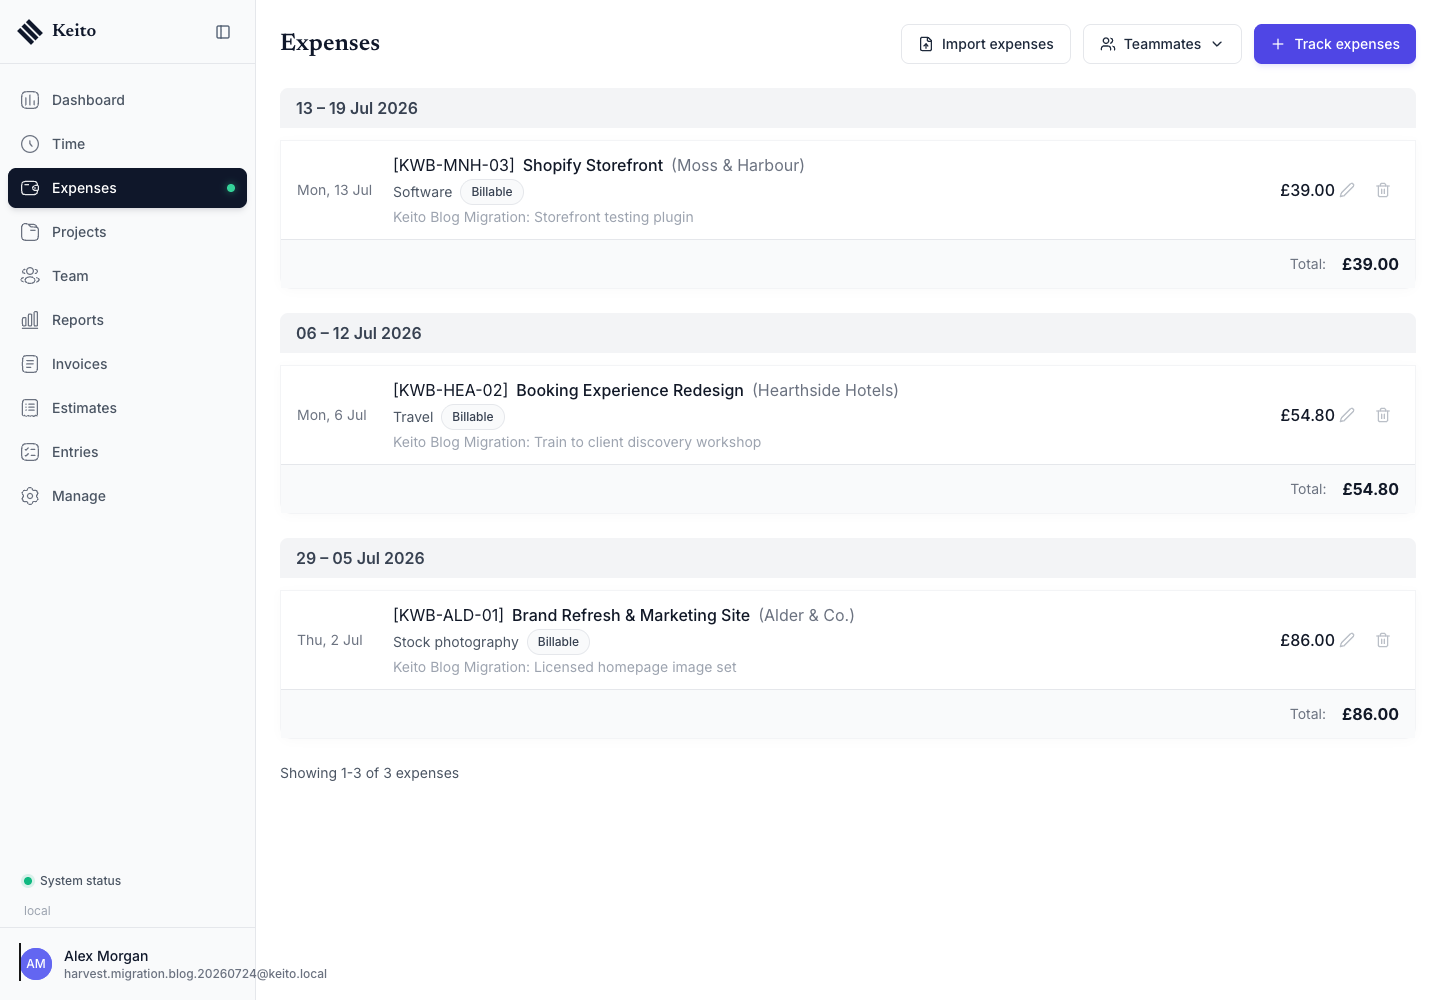
The example contains one expense for each project: stock photography, client travel and a software plugin.
Verify invoices
Open Invoices, choose All, and scroll to the document list. Check invoice numbers, clients, issue dates, due dates, states, amounts and outstanding balances.
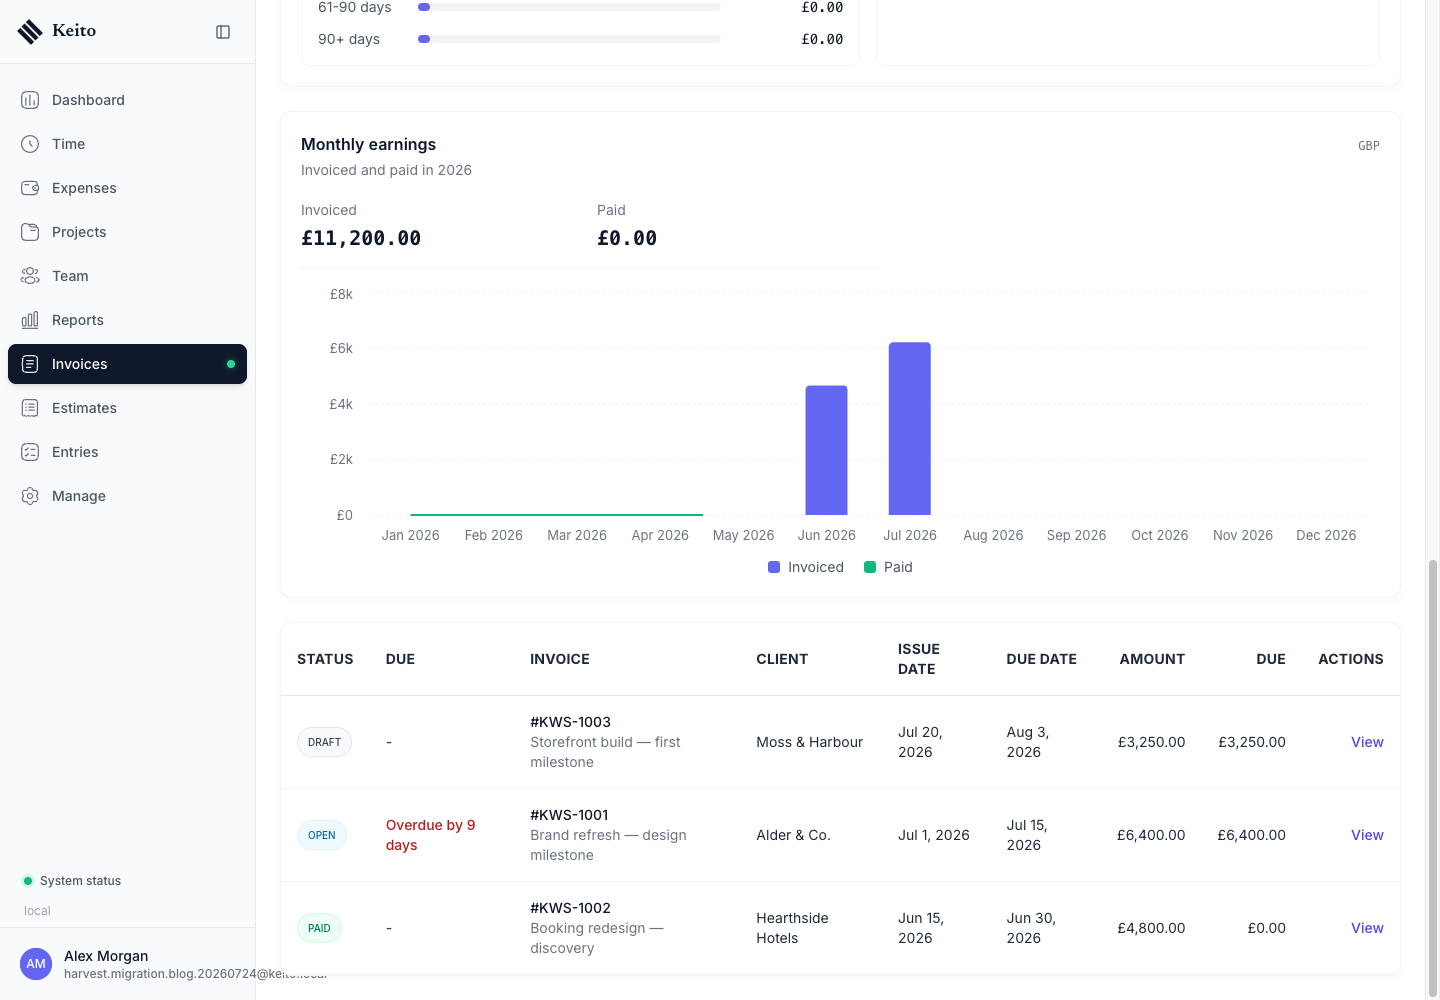
The test deliberately included three states—draft, open and paid—to prove that the importer did not flatten every invoice into the same status.
Verify estimates
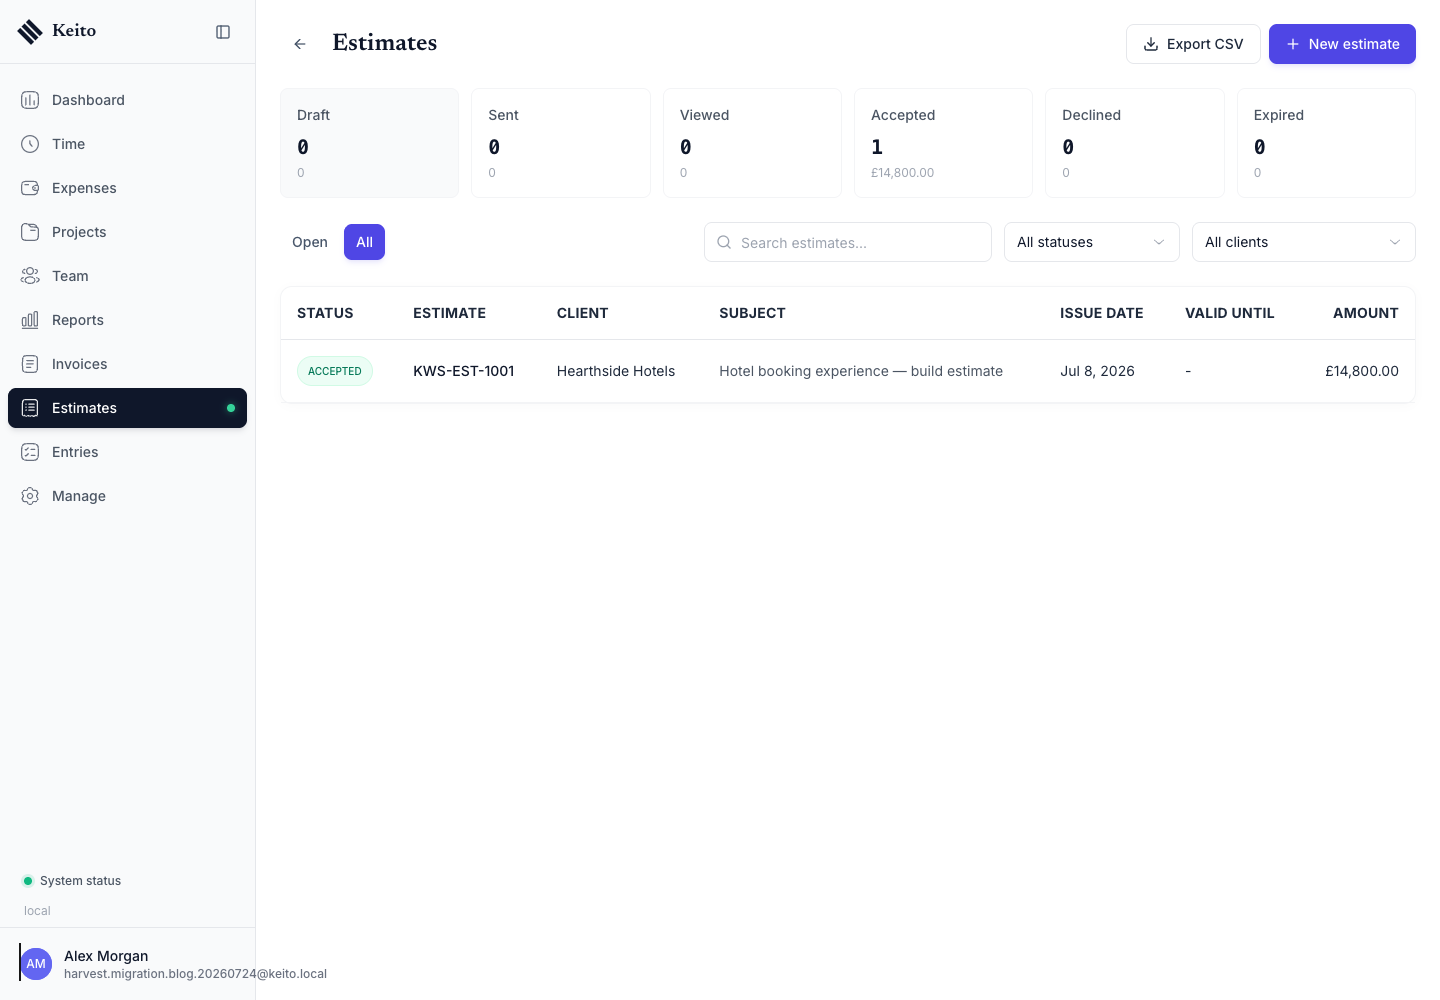
Open Estimates and choose All. Accepted or declined estimates will not appear under the default open-only view.
Verify report templates
Open Reports → Saved reports. When report templates are selected, Keito creates nine useful starting views for time, expenses, budgets, contractors and uninvoiced work.
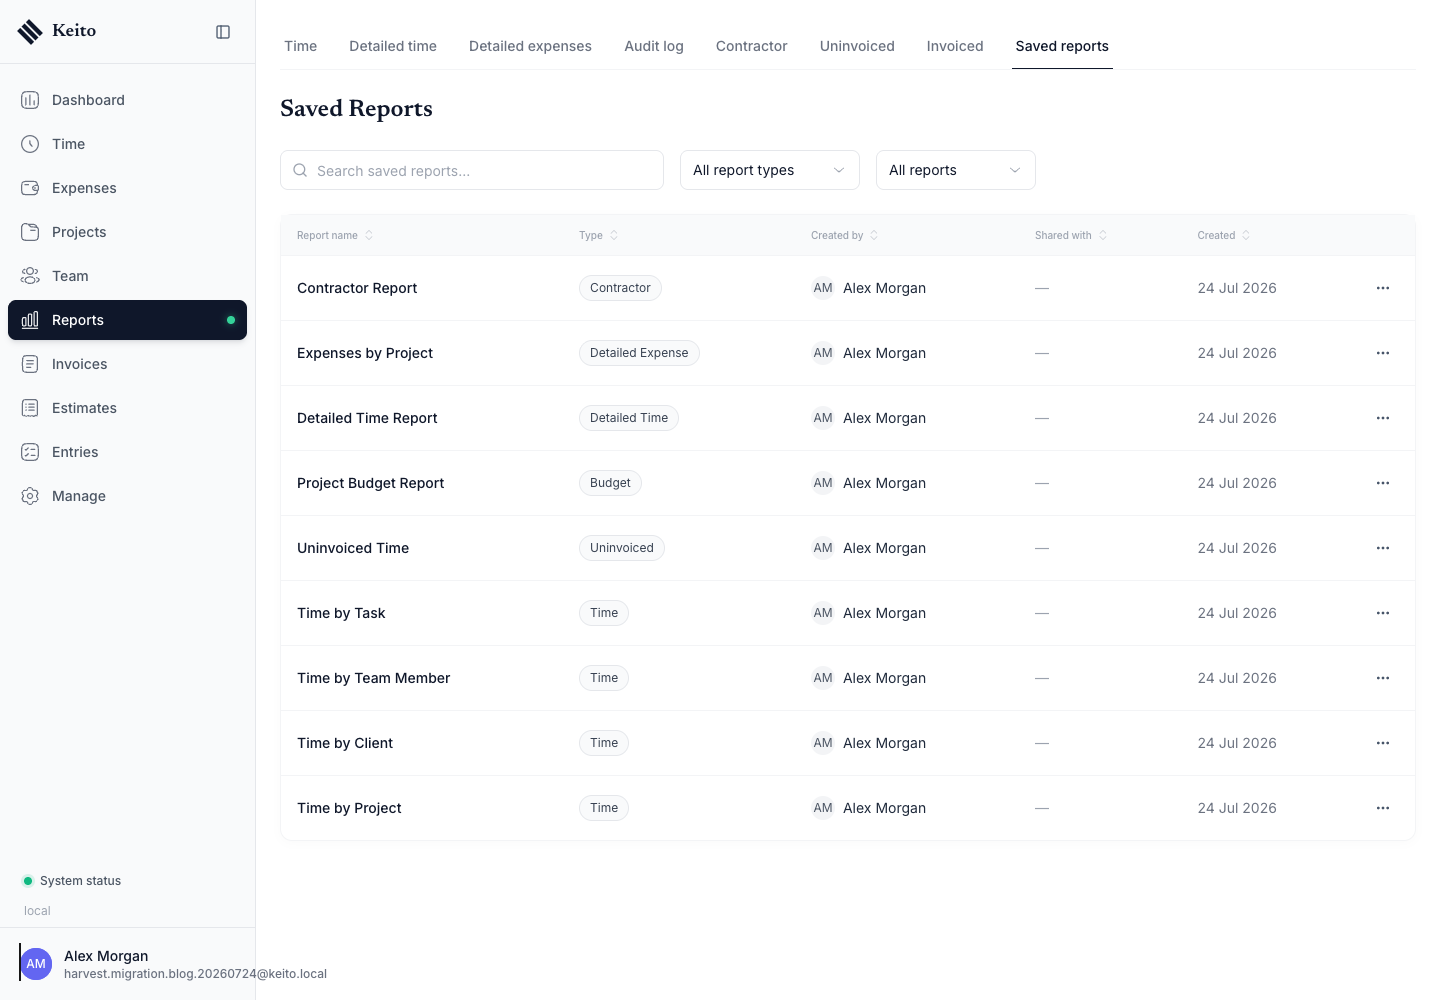
These are Keito templates created for the new workspace, not copies of a saved Harvest report layout.
Verify tasks
Go to Manage → Tasks. Confirm source-specific tasks and their default rates.
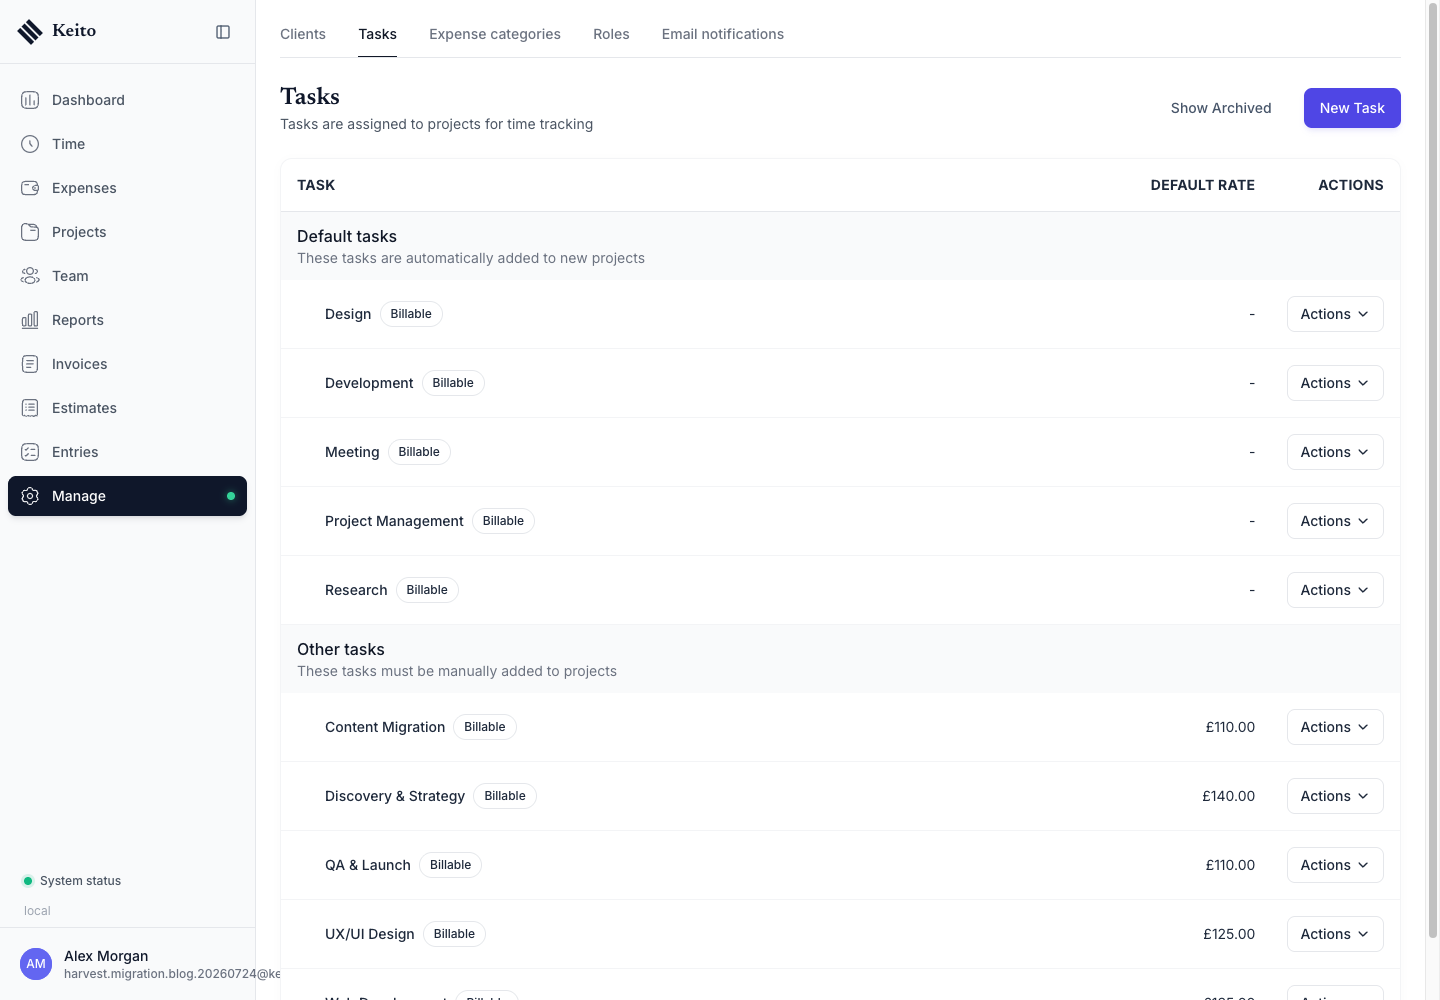
Matching defaults are reused. In our test, the six Harvest tasks resulted in five new task names because Project Management already matched a Keito default.
Verify expense categories
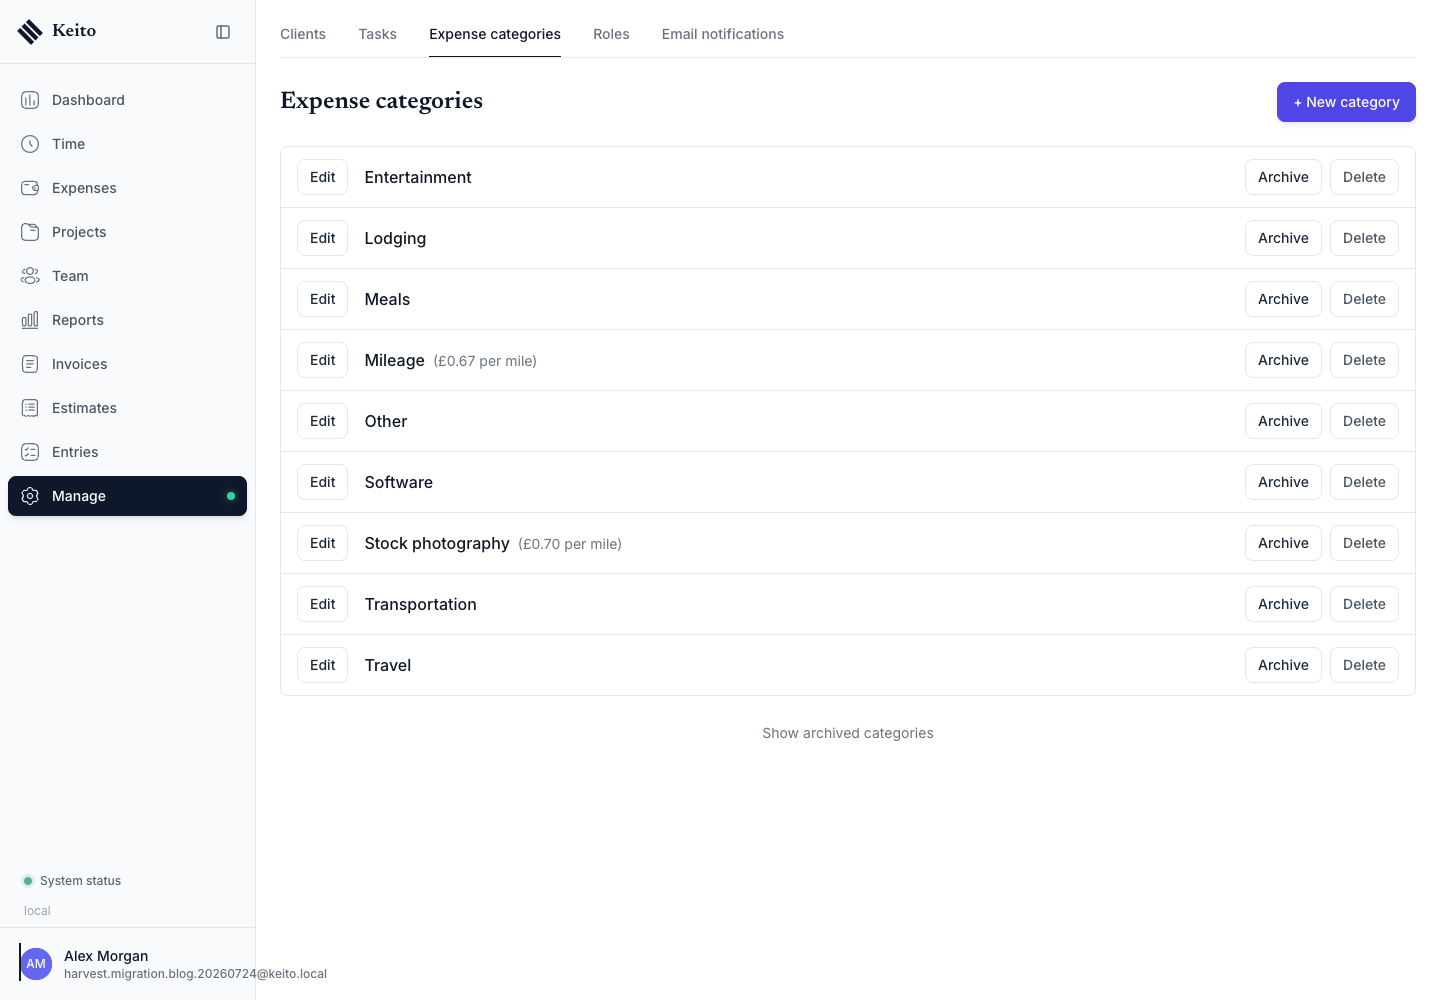
Go to Manage → Expense categories and confirm that every category referenced by an imported expense exists.
Verify workspace settings
Finally, open Settings. Confirm the company identity, account owner, currency, timezone, time-entry preferences and working week for the target workspace.
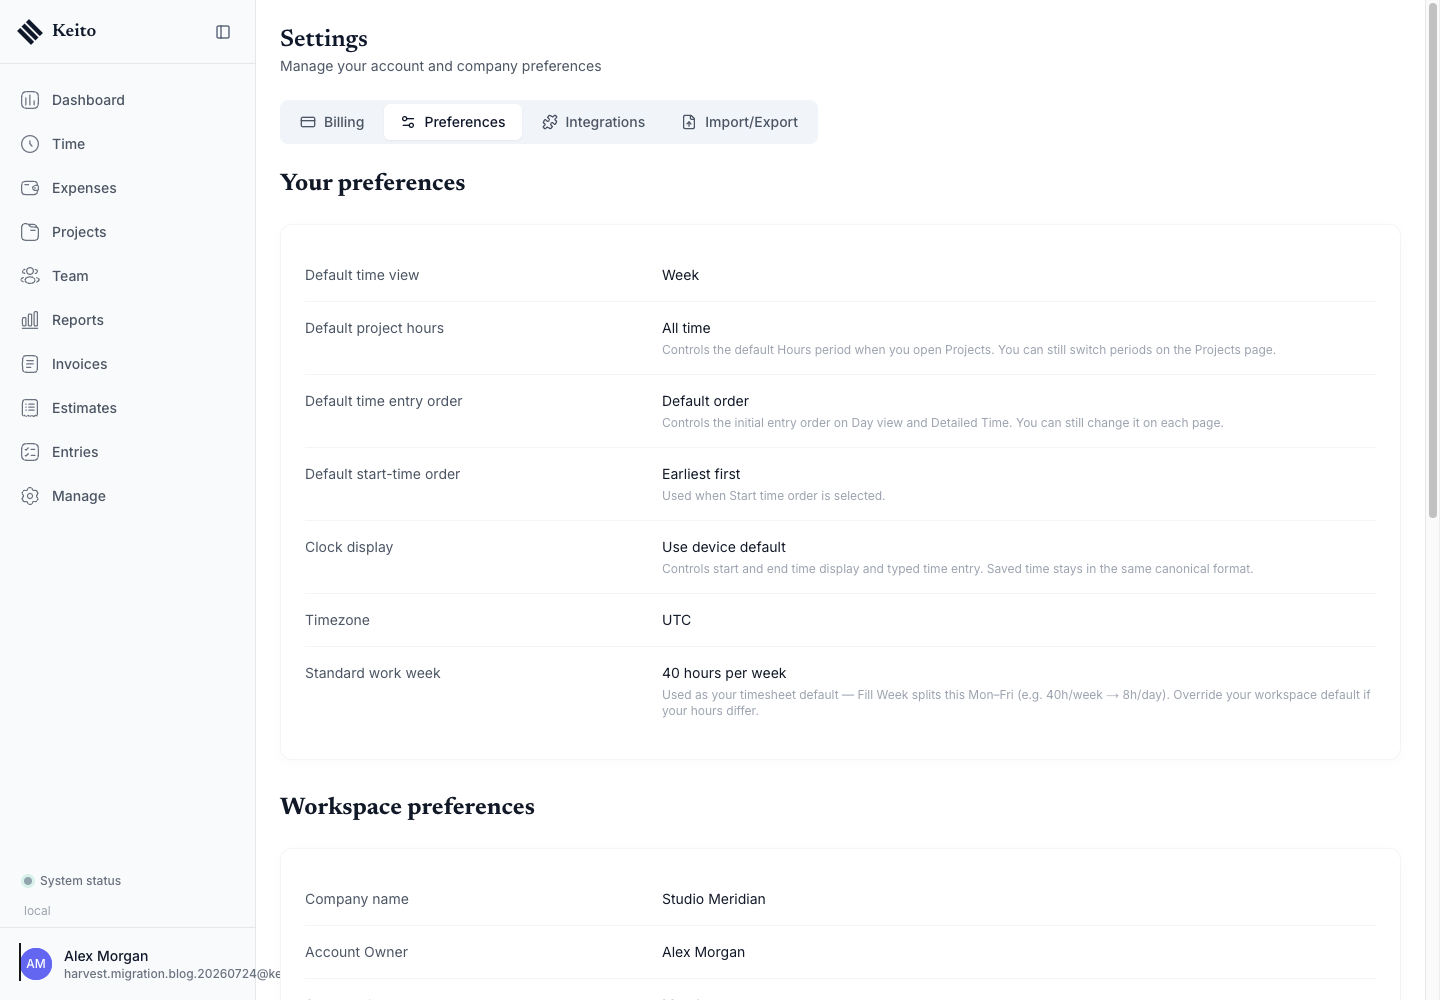
These target settings control new work in Keito, so review them even though they are not part of the Harvest record import.
Our migration reconciliation result
The isolated Keito database contained:
| Keito record | Final count |
|---|---|
| Clients | 3 |
| Projects | 3 |
| Tasks | 10 |
| Time entries | 15 |
| Expenses | 3 |
| Expense categories | 9 |
| Invoices | 3 |
| Estimates | 1 |
| Saved reports | 9 |
The task and expense-category totals include Keito’s built-in defaults. All three background jobs finished with COMPLETED status:
| Import job | Completed | Skipped | Errors |
|---|---|---|---|
| Projects and assignments | 6 / 6 | 0 | 0 |
| Time entries | 15 / 15 | 0 | 0 |
| Expenses, invoices, estimates and reports | 16 / 16 | 0 | 0 |
This count-based reconciliation is useful, but financial migrations need a second check. Compare total invoice value, outstanding balances, paid states and expense totals—not just the number of rows.
A safe cutover plan
For an active team, use a controlled cutover rather than switching without notice.
1. Run the initial import
Import and review the workspace while the team continues using Harvest. This proves identity and data mappings before the cutover.
2. Choose a freeze time
Tell the team when new Harvest timers and edits must stop. A Friday afternoon or end of a billing period is usually easier to reconcile than the middle of a working day.
3. Reconcile the final source window
Check for Harvest changes made after the initial import. If your migration requires a final refresh, complete it before inviting the wider team to Keito.
4. Invite the team and start new work in Keito
Review permissions first, then send invitations. Make Keito the system for all new time, expenses, invoices and estimates from the agreed date.
5. Keep Harvest read-only temporarily
Do not immediately delete the source account. Retain access for at least one complete billing and reporting cycle, subject to your retention policy and Harvest subscription terms.
6. Revoke the migration token
Once validation and any final refresh are complete, revoke or rotate the temporary Harvest Personal Access Token.
Troubleshooting a Harvest import
The connection test fails
Confirm that:
- the Account ID belongs to the same account as the token;
- the token has not been revoked;
- the Harvest user still has access to the account;
- the Account ID contains digits only;
- no spaces were added before or after either value.
The preview count is lower than expected
Harvest API access follows the permissions of the token owner. Use an administrator account for a complete company migration, or confirm that the selected user can see every relevant person, client and project.
Also check whether records are archived or inactive. The preview is the right place to resolve a discrepancy—before any target records are created.
A user cannot be matched
Match the Harvest owner or team member to the correct Keito login during setup. Imported teammates can be reviewed before invitations are sent.
An accepted estimate appears to be missing
The Estimates screen opens on Open. Select All to see accepted, declined and expired documents.
Tasks or expense categories have a higher final count
Keito includes useful default records. The importer reuses matching defaults and adds source-specific names, so the final total is not always identical to the number of Harvest records created.
The import stops after a completed phase
Completed phases persist. Reopen the onboarding import screen and review the current job state before starting another import. If the same phase repeatedly fails, record the phase name and contact Keito support with the non-sensitive error message—never send the Personal Access Token.
Harvest migration security checklist
- Create a dedicated temporary Personal Access Token when practical.
- Never include the token in screenshots, tickets, documents or source control.
- Use an administrator only for the migration window.
- Compare preview counts before starting the import.
- Keep source exports in encrypted storage with limited access.
- Do not invite imported teammates until permissions are reviewed.
- Revoke or rotate the token after reconciliation.
- Keep Harvest as a temporary read-only rollback source.
Frequently asked questions
Can I migrate all of my Harvest history to Keito?
Keito imports the selected records available to the authenticated Harvest user through the API rather than asking you to upload a recent-period CSV. Compare the preview counts with Harvest before starting. For a very large or unusually configured account, contact Keito before the cutover so edge cases can be reviewed.
What Harvest data can Keito import?
The onboarding importer supports clients, projects, tasks, team members, roles when present, time entries, expenses, expense categories, invoices and estimates. It can also create nine Keito report templates for the target workspace.
Does the migration send invitations to my Harvest team?
No. Imported team members are added but not automatically invited. An administrator can review identities, roles and permissions first.
Will my Harvest invoices and estimates keep their status?
The importer maps financial documents into Keito states. Our production-like test preserved draft, open and paid invoices plus an accepted estimate. Always reconcile document numbers, dates, amounts and balances for your own account.
Do I need to delete or tidy Harvest before importing?
No. Do not delete live source data to prepare a migration. You may archive genuine duplicates or obsolete test records if that is already part of your normal data-governance process, but keep the source available until validation is complete.
How long does a Harvest to Keito migration take?
The automated runtime depends on the number of people, projects, time entries and financial documents. The small dataset in this guide completed quickly enough that later phases finished within a single interface polling interval. Plan additional time for reconciliation, which is more important than the raw import duration.
Can I close the page during the migration?
Completed phases persist. For the clearest result, leave the page open until the final success message appears, especially during the active phase.
What should I verify before cancelling Harvest?
Verify clients, projects, task mappings, people, total hours, billable states, expenses, invoice values, outstanding balances, estimate states, currency and workspace settings. Run at least one normal billing and reporting cycle in Keito before removing access to the source.
Ready to move?
The safest Harvest migration is a repeatable process: preview, import in dependency order, reconcile every business area, cut over at an agreed time and retain a temporary rollback source.
Start your Keito free trial to open the Harvest importer, compare Keito with Harvest, or review Keito reporting with screenshots before deciding.