Zendesk Time Tracking Integration
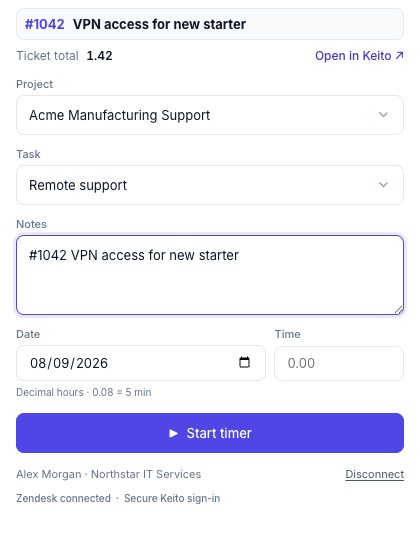
Keito adds project-based time tracking to the Zendesk Support ticket sidebar. An agent can start a timer or enter time manually without leaving the ticket. Keito records the Zendesk ticket context with the time entry, shows the total time already recorded for that ticket, and links back to the relevant day and entry in Keito.
The integration is currently available as a controlled preview. A named workspace must be enabled by Keito and a Zendesk administrator installs a verified private-app package. It is not yet a public Zendesk Marketplace listing.
What The Integration Does
From a Zendesk ticket, an authorised Keito user can:
- Select an assigned Keito project and task.
- Start or stop the same timer used by Keito’s web, desktop, CLI, and agent interfaces.
- Add a manual entry for today or an earlier date.
- Use the workspace’s decimal-hours or hours-and-minutes convention.
- Edit the prefilled ticket number and subject before saving them as notes.
- See the total Keito time recorded against the ticket.
- Open the latest accessible entry in Keito’s Day view for review or editing.
The integration creates time entries in Keito. It does not add worklogs to the Zendesk ticket or change the ticket’s status, assignee, comments, or fields.
Requirements
Before setup, confirm that you have:
- A Keito workspace approved for the Zendesk controlled preview.
- A Keito owner or administrator who belongs to the intended workspace.
- A Zendesk Support account and an administrator who can upload private apps.
- Active Keito memberships for every agent who will track time.
- Projects, tasks, and project-team assignments configured in Keito.
- The versioned Keito private-app ZIP and matching SHA-256 checksum supplied by Keito.
One Zendesk account is bound to one Keito workspace. The first person to connect an unbound installation must be a Keito owner or administrator. If that person belongs to more than one Keito workspace, contact Keito before connecting so the installation is not bound to the wrong workspace.
Request Preview Access
Email support@keito.ai with:
- Your Keito workspace name.
- The email address of the Keito owner or administrator leading setup.
- Your exact Zendesk hostname, such as
example.zendesk.com. - The Zendesk administrator who will install the app.
- The agents included in the preview.
Keito will confirm access, enable the named workspace, and provide the private-app ZIP and checksum. Do not reuse a package supplied for another customer or circulate the ZIP outside your approved account.
Install The Private App In Zendesk
The following steps are completed by a Zendesk administrator. Zendesk also documents the general private-app upload process.
- Download the versioned Keito ZIP and
.sha256file supplied by Keito. - Verify that the ZIP checksum matches the supplied value.
- In Zendesk Admin Center, go to Apps and integrations > Apps > Zendesk Support apps.
- Select Upload private app.
- Enter
Keitoas the app name, choose the supplied ZIP, and upload it. - Review Zendesk’s private-app warning and install the app.
- Open a non-sensitive test ticket.
- Expand Apps > Keito in the ticket’s right-hand sidebar.
On macOS or Linux, verify the supplied checksum with:
shasum -a 256 -c keito-zendesk-v0.1.0.zip.sha256On Windows PowerShell, run:
Get-FileHash .\keito-zendesk-v0.1.0.zip -Algorithm SHA256Compare the PowerShell result with the value in the supplied .sha256 file.
Connect The Zendesk Account To Keito
- Open the Keito app on a test ticket.
- Select Sign in to Keito.
- Complete the Keito sign-in in the new window using your own account, not a shared login.
- On the first connection, use a Keito owner or administrator for the intended workspace.
- Return to Zendesk and confirm the footer shows the expected person and Keito workspace.
- Select a test project and task, then record a short test entry.
After the installation is bound, each additional Zendesk agent signs in with their own Keito account. They do not need to be a Keito administrator, but they must be an active workspace member with access to the required project and task.
Track Time With The Timer
Leave the Time field empty when the work is happening now:
- Select the project and task.
- Review or edit the ticket number and subject in Notes.
- Select Start timer.
- Work on the ticket.
- Select Stop timer when finished.
Keito uses one running timer per user across its interfaces. If a timer is already running elsewhere, the sidebar explains which project and task it belongs to. You can keep it running or explicitly switch it to the current ticket.
Add Time Manually
Use manual entry for completed work or when the time belongs to an earlier date:
- Select the project and task.
- Choose today or an earlier date in Date.
- Enter a duration in Time.
- Review or edit the notes.
- Select Save entry, or press Enter while the Time field is active.
The button changes automatically: an empty Time field means Start timer; entering a duration changes it to Save entry.
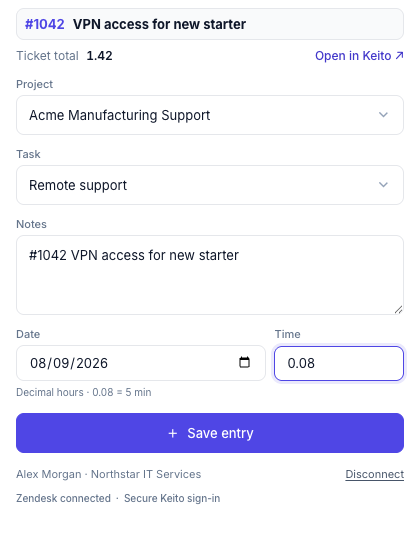
0.08 is saved as five minutes.Duration Formats
The Zendesk app follows the time format configured for your Keito workspace.
| Workspace format | Five-minute example | Thirty-minute example |
|---|---|---|
| Decimal hours | 0.08 |
0.50 |
| Hours and minutes | 0:05 |
0:30 |
The decimal separator also follows the workspace setting. Keito converts valid decimal input to whole minutes before saving. Future dates are not accepted, and normal Keito approval and timesheet-lock rules still apply.
How Ticket Context Is Recorded
When you start a timer or save a manual entry, Keito records:
- The selected Keito project and task.
- The agent, date, and duration.
- The editable notes, initially populated with the Zendesk ticket number and subject.
- The Zendesk ticket ID, group ID, account hostname, and ticket permalink as integration metadata.
That metadata is what lets Keito calculate a ticket total and return to the correct entry later. The Zendesk subject is copied at the point of entry creation; changing the Zendesk subject later does not silently rewrite an existing Keito entry.
Ticket Total And Open In Keito
Ticket total is the combined Keito duration currently associated with that Zendesk ticket. It uses the workspace’s configured display format.
Select Open in Keito to open Keito in a new browser tab:
- When an accessible entry exists, Keito opens its date in Day view and selects the entry for editing.
- Owners and administrators can be directed to a team member’s accessible entry.
- Other users are directed only to an entry they are allowed to access.
- If there is no accessible entry yet, Keito opens the relevant Day view without selecting one.
Edits are still subject to Keito’s role, approval, invoicing, and timesheet-lock rules.
Project And Task Selection
The sidebar shows active projects and tasks available to the connected Keito user. When the ticket already has Keito time, the most recently used project and task are preselected where possible.
If a project or task is missing:
- Confirm it is active in Keito.
- Confirm the agent is assigned to the project.
- Confirm the task belongs to that project and is active.
- Refresh the Zendesk ticket after an administrator updates access.
See Project Team and Tasks for Keito assignment guidance.
Updates And Reinstallation
Most Keito Zendesk updates do not require reinstalling the app. The small Zendesk package loads the interface securely from app.keito.ai, so a ticket refresh loads the latest compatible hosted version.
Refresh the ticket tab, or use Zendesk’s Reload all apps action, after Keito announces an update. Keito will tell your Zendesk administrator if a future change modifies the package manifest or permissions and requires a replacement ZIP.
Security And Data Boundaries
- Zendesk signs the initial app launch. Keito verifies the Zendesk account, app installation, current agent, product, and sidebar location before serving the app.
- The browser receives a short-lived, app-specific session. It does not receive a long-lived Keito API credential.
- Keito sign-in uses an authorisation-code flow with PKCE. Refresh credentials are encrypted and stored server-side.
- The installable ZIP contains metadata, translations, and icons. It contains no Keito API key, WorkOS secret, Zendesk private key, or customer token.
- Each installation is bound to one explicitly enabled Keito workspace.
- The current integration reads the ticket context needed for time attribution. It does not call the Zendesk REST API to modify tickets.
See the Privacy Policy for Keito’s broader data-handling commitments.
Disconnect Or Uninstall
To disconnect only your personal Keito connection, select Disconnect in the sidebar footer. This removes the stored connection for your Zendesk agent identity; it does not delete existing time entries.
To remove the app for everyone, a Zendesk administrator can uninstall it from Admin Center > Apps and integrations > Apps > Zendesk Support apps. Contact Keito as well so preview access and the server-side installation binding can be disabled.
Troubleshooting
The app says the session expired
Refresh the Zendesk ticket. A new Zendesk-signed launch creates a fresh short-lived app session. Normal hosted updates and session renewal do not require reinstalling the private app.
The app asks me to sign in again
Select Sign in to Keito and complete the connection with your own Keito account. If sign-in repeatedly fails, send Keito the Zendesk hostname, ticket ID, timestamp with timezone, and exact visible error text. Do not send an unredacted customer ticket screenshot.
No projects or tasks appear
Check that you are an active member of the bound Keito workspace and assigned to an active project with at least one active task.
A timer is already running elsewhere
Keito permits one running timer per user. Stop the other timer, keep it running, or use the explicit switch action shown in the sidebar.
A saved entry is not immediately visible elsewhere
The sidebar refreshes its timer and ticket summary after a successful save and periodically while open. Keito’s other interfaces also reconcile changes, but a manual refresh is a safe recovery step if an older tab has been suspended by the browser.
Open in Keito does not select an entry
The linked entry may no longer be editable or accessible to your role, or the ticket may not have an accessible entry yet. Keito still opens the appropriate Day view so you can review the date.
Acceptance Checklist
Complete this checklist on a non-sensitive test ticket:
- The app loads and shows the expected Keito user and workspace.
- The expected project and task are available.
- The ticket number and subject appear in editable notes.
- Start and stop a short timer.
- Add a five-minute manual entry for an earlier date.
- Confirm Ticket total increases.
- Confirm Open in Keito opens Day view and the expected entry.
- Refresh the Zendesk ticket and confirm the connection and total persist.