
Migrate from Clockify
Owners and administrators can open the Clockify importer. Like the Harvest importer, it brings across everyone’s history from your Clockify workspace, including people who have since left.
The importer copies clients, projects, tasks and time entries from one Clockify workspace into an existing Keito workspace. When you import everyone, it also brings across the people who tracked that time. You run it from Settings → Import data. It is not an onboarding step or a continuous sync, and it never changes anything in Clockify: Keito only reads your Clockify data.
For a shorter walkthrough, see How to migrate from Clockify to Keito.
The screenshots and figures on this page come from Northstar Studio, a fictional Clockify test workspace. Its clients, projects and [SAMPLE] people are sample data. Account names and email addresses are masked in every screenshot.
What the import covers
| Clockify data | What happens in Keito |
|---|---|
| Clients | Each one is created in Keito, mapped to an existing Keito client, or excluded |
| Projects and tasks | Created, mapped or excluded. Private projects must be mapped to an existing Keito project or excluded |
| Time entries | All history since the oldest month Keito finds, or a custom date range you set |
| Team members | Each person is mapped to an existing Keito member, added as a historical person, or excluded along with their time |
| Hourly and cost rates | Imported only when verified and in a matching currency; otherwise left unknown |
| Breaks, holidays, time off and running timers | Skipped and reported in the result |
These are the only data types the importer offers. Imported time is kept out of invoicing until an administrator reviews its billing.
Before you connect
- Sign in as an owner or administrator of the Keito workspace you are importing into.
- Find out which data region your Clockify workspace uses. In Clockify, it’s under Workspace settings → Security → Data region. Keito supports Global, EU and UK workspaces. USA and Australia are coming.
- Create an API key as a Clockify owner or administrator of that workspace. In Clockify, open your profile menu, choose Preferences, go to the Advanced tab, then select Manage API keys and Generate new. Use this API key, not your Clockify password, and do not paste it anywhere except the Keito importer.
- Make a list of anyone who is already a Keito member, so you can match them to their Clockify history.
- If you want to keep any private Clockify projects, create the matching client and project in Keito first, in the same currency.
- Choose the administrator who will review the billing of imported time.
Keito encrypts your API key, clears the field once you submit it, and deletes the key when the import no longer needs it. If an import is paused, its key expires after 7 days.
1. Open the Clockify importer
In Keito, go to Settings → Import data and choose Clockify in the provider switch (Harvest · Forecast · Toggl Track · Clockify).
You can also use the direct link, app.keito.ai/imports/clockify. After you sign in and choose a workspace, it opens the Clockify tab. The link does not grant access to a workspace: only owners and administrators can use the importer.
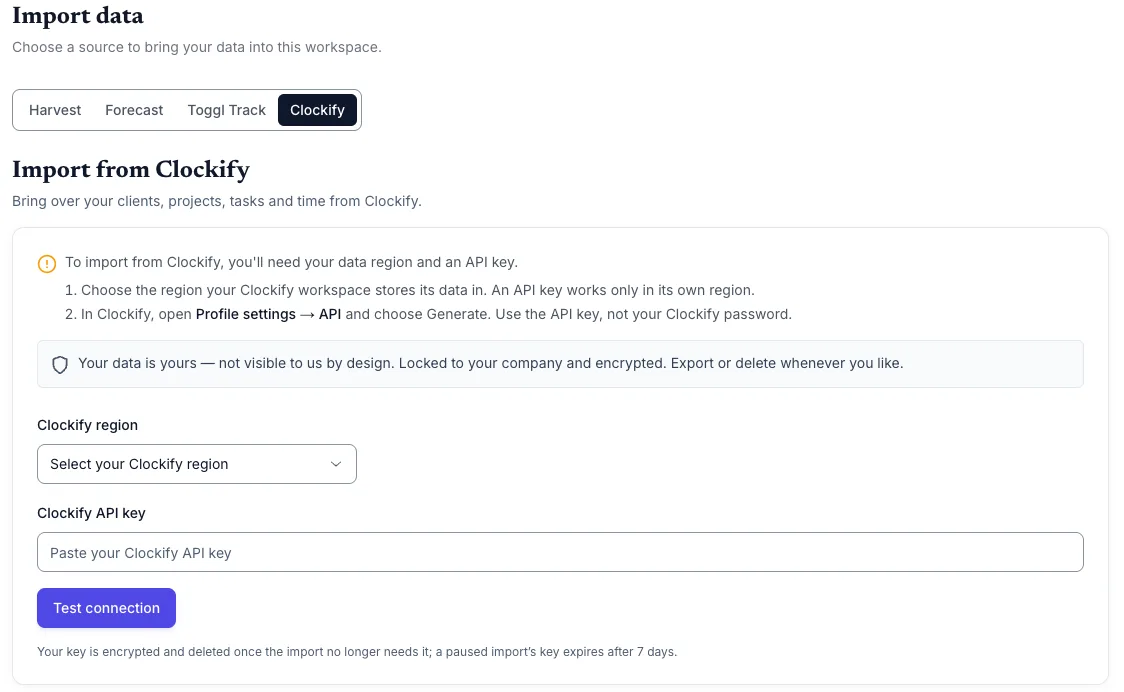
2. Connect and choose a workspace
Choose your Clockify region, paste the key into Clockify API key, then select Test connection.
If your Clockify account belongs to several workspaces, pick one under Clockify workspace and select Review workspace. Keito then scans the workspace’s clients, projects, tasks and people, and finds how far back its time history goes. Scanning does not import anything.
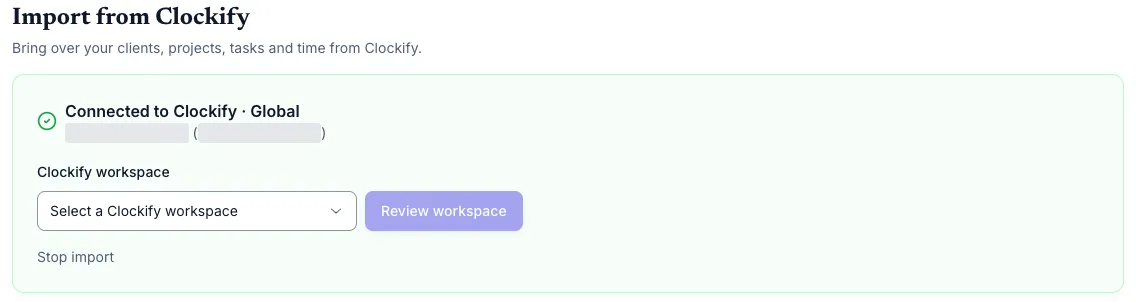
3. Confirm the connected account
Keito always imports everyone’s history from the Clockify workspace, including members who have since been deactivated. Nobody is invited, and you decide what happens to each person in step 5. Your own Clockify time is imported as you: tick I confirm this Clockify account represents me in this Keito workspace once you have checked the connected account is yours.
The API key must belong to a Clockify owner or administrator of the workspace, because only they can read everyone’s time. If it belongs to a regular member, Keito stops and asks for an owner’s or administrator’s key.
4. Choose data and dates
Each data type has its own row with the count Keito found in Clockify:
- Clients, Projects and Tasks.
- Time entries, which default to All history since the oldest month found (for example, All history since January 2023). To import a shorter period, open Advanced options and select Use a custom date range.
- Team members. People are added as historical people and are not invited.
Breaks, holidays, time off and running timers are skipped and listed in the result. Each time entry is placed using its own Clockify time zone. If an entry has no time zone, Keito uses its creator’s profile time zone.
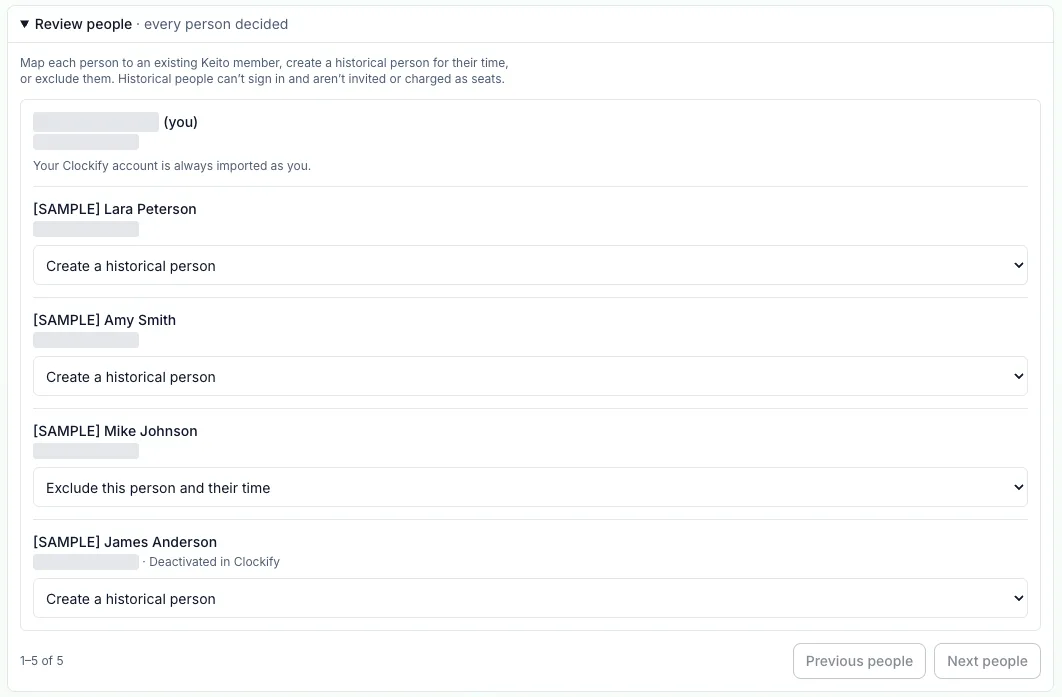
5. Review people
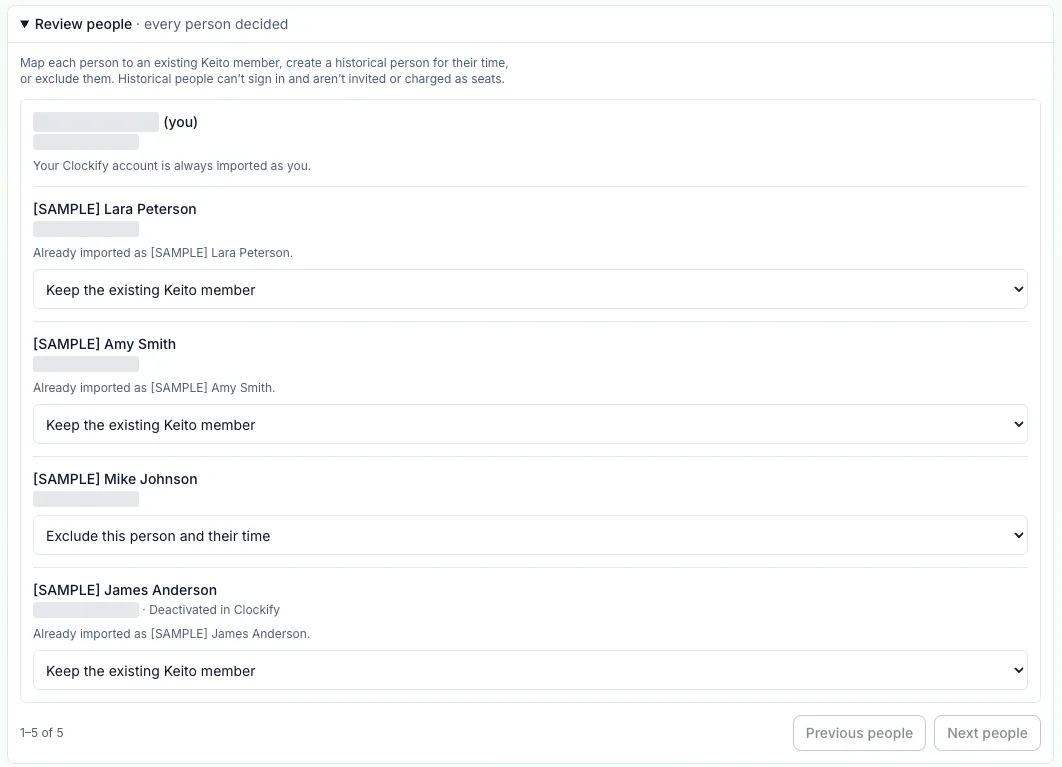
Open Review people and choose an outcome for each person:
- Map them to an existing Keito member.
- Create a historical person to hold their time.
- Exclude this person and their time.
Historical people cannot sign in, are not invited and are not charged as seats. Members deactivated in Clockify are flagged Deactivated in Clockify. Your own Clockify account is always imported as you.
A matching email address is only a suggestion. Keito never applies it automatically.
6. Review clients, projects and tasks
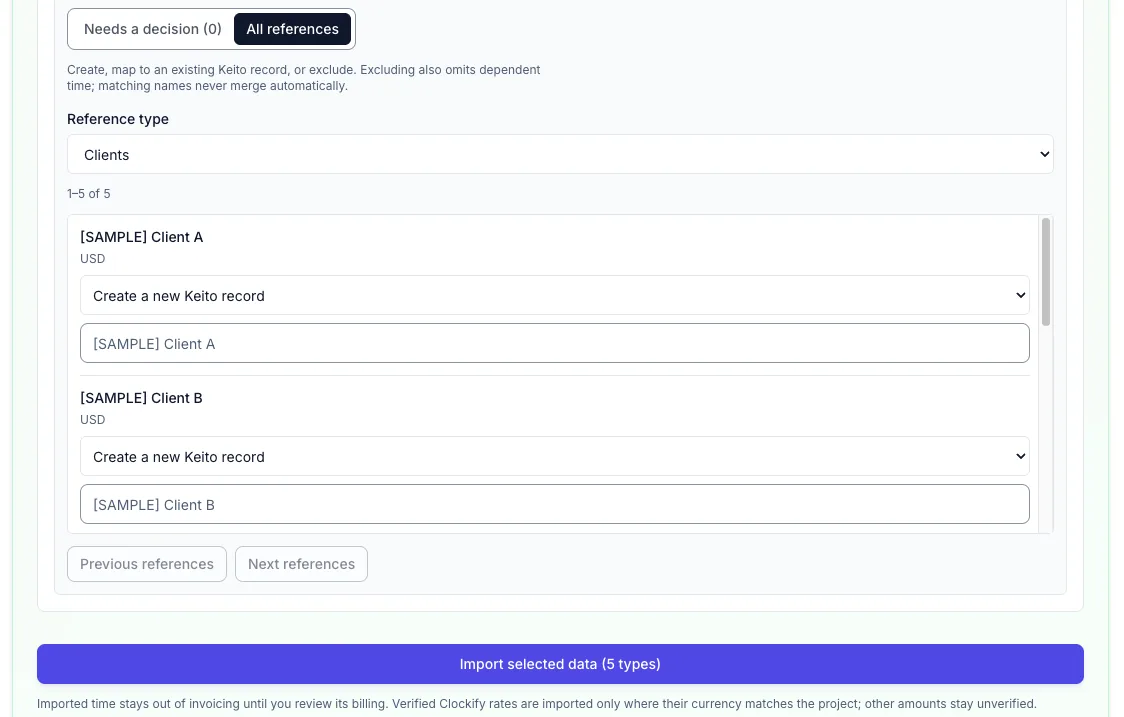
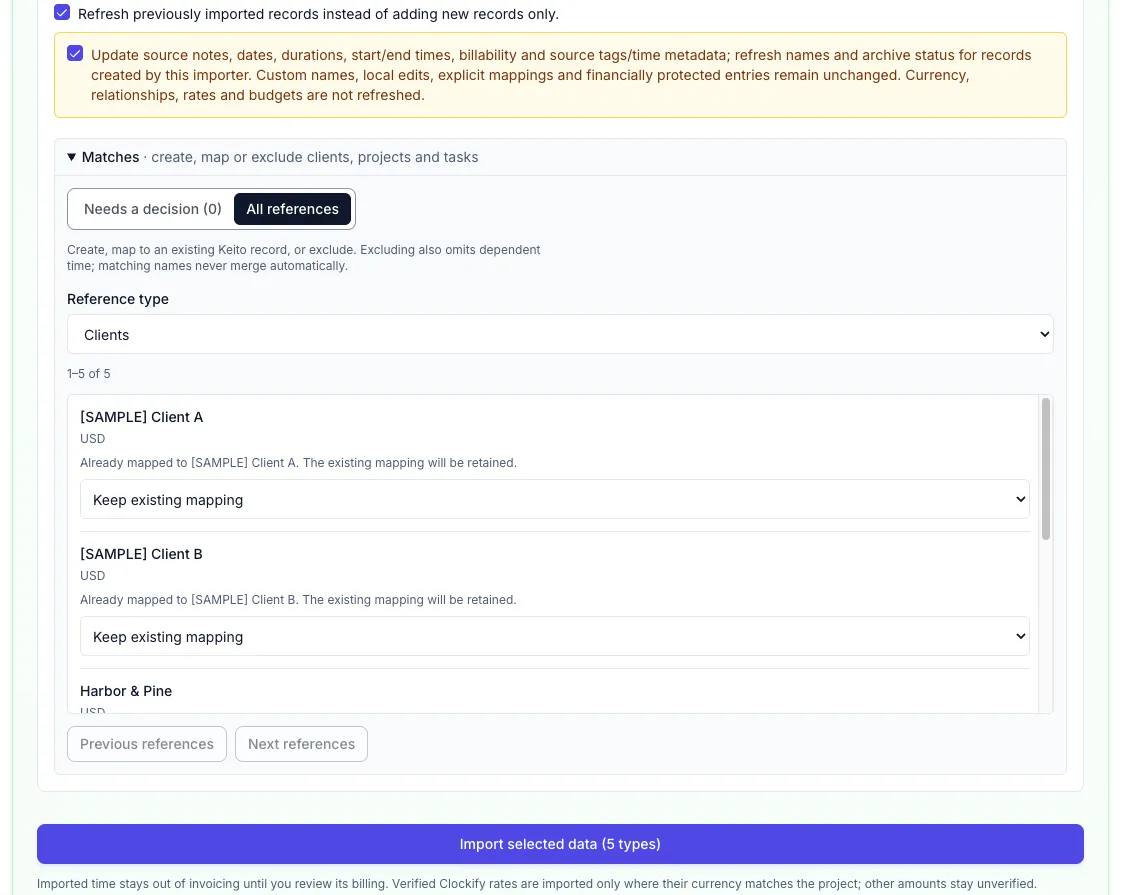
Open Advanced options, then Matches. Needs a decision lists what you must resolve; All references lists everything. Use Reference type to move between clients, projects and tasks. For each one, create a new Keito record, map it to an existing record, or exclude it.
Private Clockify projects always need a decision: map each one to an existing Keito project or exclude it. To map a private project, first create its Keito client and project in the same currency. Excluding a client or project also leaves out its time. Records with matching names are never merged automatically.
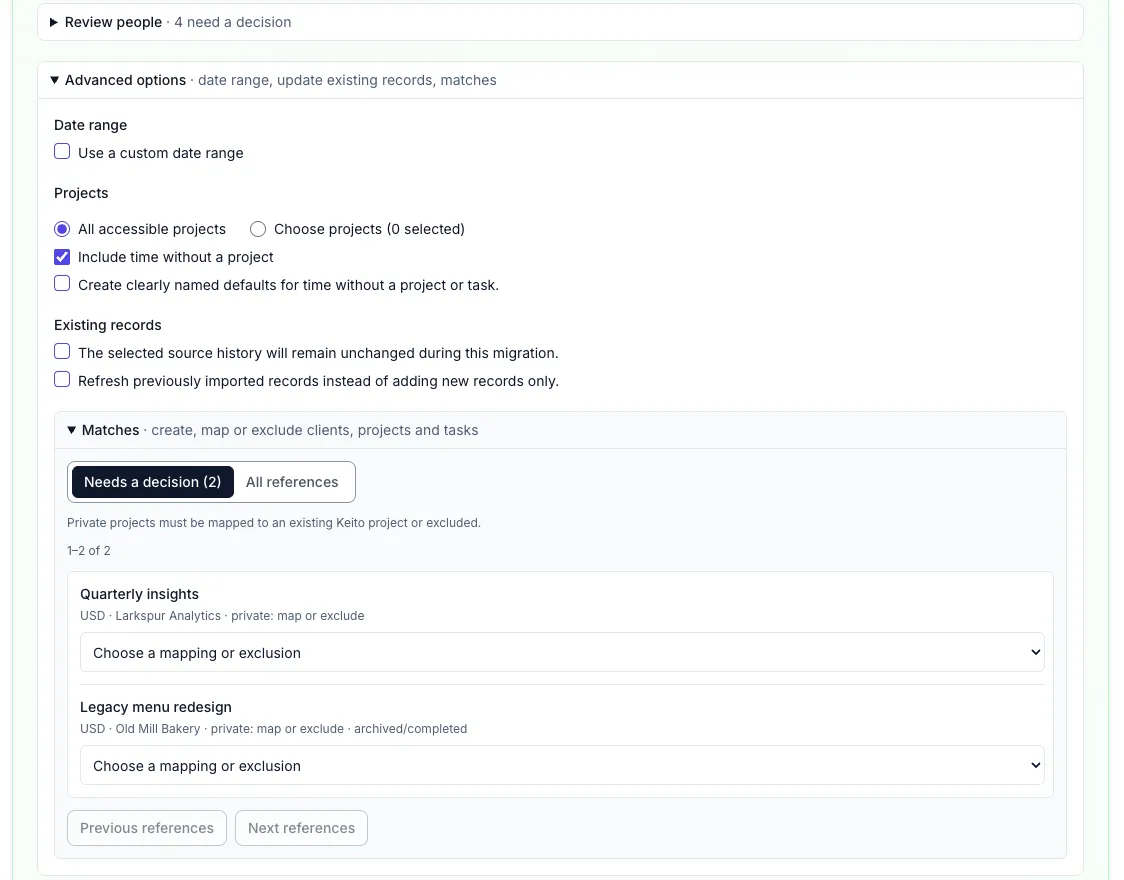
Some time may have no project, or belong to a project without a client. Under Advanced options, you can choose Create clearly named defaults for time without a project or task to keep that time under named default records. Otherwise, it is left out.
When something still needs a choice, the import button stays disabled and the panel says what is missing. Use Review source choices to find it. Once every choice is made, select Import selected data.
7. Follow progress
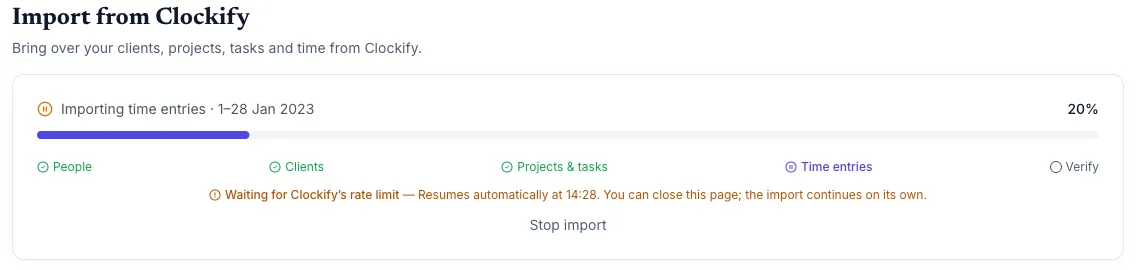
The progress panel moves through People → Clients → Projects & tasks → Time entries → Verify. Its percentage comes from real record counts. You can close the page; the import continues on its own.
Clockify’s Free plan allows about 30 API requests an hour, so importing a long history from a Free workspace can take hours. Paid Clockify plans are much faster. While Keito waits for Clockify’s rate limit, the panel shows when the import will resume.
| What you see | What to do |
|---|---|
| Waiting for Clockify’s rate limit | Nothing. The import resumes at the time shown |
| You want to end the import early | Select Stop import. Records already imported stay in Keito |
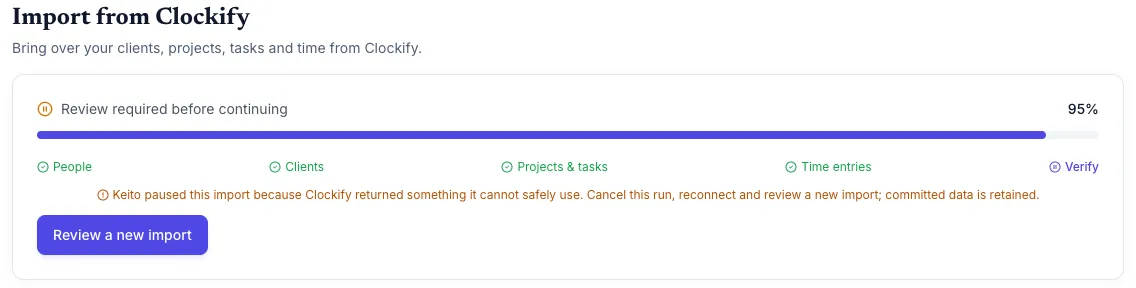
| Keito paused because Clockify returned something it cannot safely use | Select Review a new import. The run is canceled, imported records are kept, and you reconnect and review again |
| Clockify rejected the API key | Select Replace API key |
8. Check the result
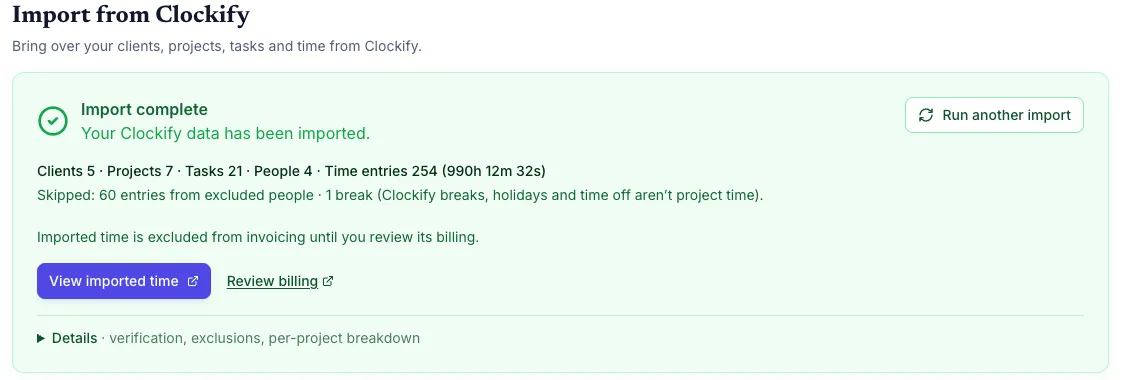
When the import finishes, the panel shows what arrived: clients, projects, tasks, people and time entries, with the total duration. It also lists what was skipped. From there you can:
- View imported time to see the entries in Keito.
- Review billing to decide which imported time can be invoiced.
- Open Details for verification, exclusions and a per-project breakdown.
Rates and billing
Keito imports verified Clockify hourly and cost rates only when their currency matches Keito’s: the project’s currency for billable rates, and the person’s cost currency for cost rates. Other amounts stay unknown. There is no currency conversion, and Keito does not fill gaps with today’s rates.
All imported time stays out of invoicing until an administrator reviews its billing.
Verified example
We imported Northstar Studio from the Global region on 6 November 2026, bringing across everyone’s history:
| Check | Result |
|---|---|
| Source entries observed | 315 |
| Time entries imported | 254, totaling 990h 12m 32s |
| Skipped | 60 entries from a person excluded in review, 1 break |
| Verification | Matched at 315 entries and 4,446,752 seconds |
| Per person | Entries, seconds and rates reconciled against Clockify |
| Identical re-run | Created and updated nothing |
| Refresh | Applied one Clockify description change and kept a local Keito edit |
These figures describe one fictional test workspace. Check your own import the same way: compare entries and durations per person and per project against Clockify. The client, project, task, team and time rows of Verify imported data show where to look in Keito; its expense, invoice and retainer rows do not apply to this import.
Run it again or refresh
You can run the importer again from the same Clockify workspace. A new-only run never duplicates entries that were already imported. People imported earlier show Keep the existing Keito member, so nobody is created twice.
To update records you already imported, open Advanced options and select Refresh previously imported records instead of adding new records only. Refresh needs a second, explicit confirmation. It updates source notes, dates, durations, start and end times, billability, and source tags and time metadata. For records this importer created, it also refreshes names and archive status.
- Custom names, local edits, explicit mappings and financially protected entries stay unchanged.
- Currency, relationships, rates and budgets are not refreshed.
- Records deleted in Clockify are not deleted in Keito.
Troubleshooting
- Test connection fails: check the region first. Keito only finds the workspace in the region where it stores its data. Make sure you pasted the API key, not your password.
- Keito says the workspace is stored in another Clockify data region: connect again and choose that region. The same API key works there.
- Keito asks for an owner’s or administrator’s key: the key belongs to a regular Clockify member. Ask a Clockify owner or administrator to create the key and connect, or to make you an administrator.
- The import is slow: a Free Clockify workspace allows about 30 API requests an hour. Leave the import running; the panel shows when it resumes.
- Fewer entries than expected: breaks, holidays, time off and running timers are skipped. Time from excluded people, clients and projects is left out too. Check the date range and the skipped lines in the result.
- You need help: contact Keito with the time of the run and what the panel shows. Never send your API key.
Before you switch
Keep Clockify available until the time reconciliation and the billing review are signed off. Then agree where new work will be recorded. The cutover checklist is reusable, but its Harvest-specific invoice and expense steps are outside this Clockify import’s scope.